


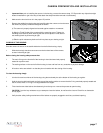


MOUNTING AND ATTACHING FLASHES
Depending on which strobe system you are using, you can mount the necessary shoes or brackets or Base Ball onto the threaded
holes on the top of the hand grips. Use of the Aquatica TLC Strobe Arm System is recommended.
There are also two 1/4”-20 threaded holes on the bottom of the housing that can be used for various mounting applications. For ex-
ample, Aquatica TLC makes a strobe arm mounting tray that will t on the bottom of the housing. A 1/4”-20
threaded hole on top of the front half of the housing will accept an Aquatica bracket or Base Ball that can hold a small
dive light or a strobe arm.
The AQUATICA Pro Digital housing can is tted with a standard manual double bulkhead connector for strobes. also available are
Ikelite manual or S6 type TTL connectors. When preparing the sync cord be sure to lubricate the O-ring on the sync cord’s connector
with a light coat of the recommended O-ring lubricant, Also advisable is to put a light coat of O-ring lubricant on the threads of this
connector.
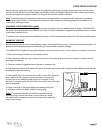
TAKING A PICTURE
Following are the basic techniques. For more information and advanced photography please study the Canon 1Ds Mk III instruction
manual.
NOTE * The Canon 1Ds Mk III allows the user to customize many of its control to better suit the photographer current needs, careful
reading of the section 10 will provide useful information on how to optimize this camera for the underwater photographer’s
requirements.
1. Push the Mode dial button ( # 11) and select the desired exposure mode with the main or quick command dial knobs, the
chosen mode will appears on both the Viewnder (# 27) and Top LCD window ( # 26). Exposure Mode options in sequence
are: Programmed Auto (P), Aperture Priority Auto (Av), Manual Exposure (M), Shutter Priority Auto (Tv) and BULB for very
long exposure (use of the Aquatica Remote grip #19302 is recommended for this mode).
2. Control of Auto Exposure compensation (# 5) is achieved by pushing down the button to engage
compensation function, select proper parameter by using either the main or quick command dial knobs .
Note: When using a ash, it is reccomended that the camera be used only in Single Frame Motor Drive or there is the
possibillity that the camera will re before the ash can recycle.
3. Push the Metering System Knob (# 13) and select the metering system symbol you wish to use in the LCD panel.
4. Pull the Shutter Release Lever (#1) partially back. This will activate the camera’s meter and autofocus system.
5. If using manual focus use the Focus Knob ( # 14) on the housing or on the at port to focus.
6. If using the Manual adjust the Main Command Knob ( # 2) or Quick Command (# 24) to set the
shutter speed and aperture value.
7. Pull the Shutter Release Lever (key # 1) the rest of the way until the camera res.
page 9