


EASY SETUP
Your Aqua-Vu Z requires no complex assembly. Follow these simple steps:
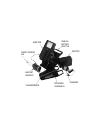
1. Connect the monitor to the Carrying Shuttle (a one-time procedure) using
the two black plastic headed thumbscrews provided. (You will tighten and
loosen these thumbscrews every time you use the Aqua-Vu Z - for
positioning/tilting the monitor for the most convenient viewing, as well as
for carrying and stowing the unit.)
2. Plug the camera cable into the "CAMERA IN" port (a one-time
procedure).
3. Place the battery into the battery well in the Carrying Shuttle, with
battery terminals towards the lower end of the unit (opposite from
handle). Position the battery lock tabs to secure the battery in place.
Connect the red wire clip to the red terminal on the battery (red to red).
Connect the black wire clip to the black terminal on the battery (black to
black).
You may also power the Aqua-Vu Z via an Auxiliary Power Cord accessory that
plugs into a cigarette lighter in vehicle or boat. The unit can operate off
any 12-volt power source. (The Auxiliary Power Cord accessory is available
through retailers, or online at www.aquavu.com.)
TESTING YOUR UNIT
1. VIEWING AN IMAGE. Locate the ON-OFF-ON/LIGHT switch at the right
end of the control line-up. Turn the switch to the ON position. Look at the
monitor screen. You should see an image. Slowly move the camera,
pointing it towards room furniture, your dog, or even your feet.You
should see a "live" image!
2. CHECKING THE CAMERA'S INFRARED LIGHTS.Turn the
ON-OFF-ON/LIGHT switch to ON/LIGHT. Choose a dark environment. An
image of whatever the camera "sees" - your face or the living room wall -
should appear on the monitor. (Note: Use the ON/LIGHT position to
activate the Aqua-Vu Z's light source to enhance viewing in low-light
conditions.)
If you fail to see an image on the monitor while conducting these tests,
see the Troubleshooting section of this manual.
Nature Vision, Inc. © Copyright 2000 Pg 2