


7
• Turn your Jukebox Multimedia on (press “ON” for 3 seconds).
• After the Camera module is connected to the Jukebox Multimedia,
pressing the “Rec’rd” (F3) will change the features of the function
buttons. (F1) now allows you to toggle switch between <JPEG> (still
image recording), <AVI> (video image recording) or <MP3> (Sound
recording).
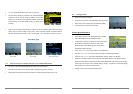
• When the camera module is detected by the Jukebox, the “Rec’rd” (F3) button goes to still image camera
preview. The (F1) button is labelled “<JPG>” versus “<MP3>” without the module. (F1) button enables to
select the recording function between “<JPG>” for still images, “<AVI>” for videos, and “<MP3>” for sound.
Recording Type
Photo Mode Video Mode MP3 Audio Mode
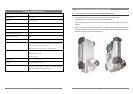
2.2 Disconnecting the Camera 100 from your Jukebox Multimedia
• Turn off your Jukebox Multimedia BEFORE disconnecting the camera module.
• Press the two side buttons on the camera module to disengage the expansion port locks.
• Gently remove the camera module from the Jukebox, and replace protective expansion port cover.
8
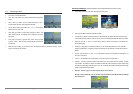
2.3 Taking Photos
• Switch on the Jukebox multimedia.
• Press “Rec’rd” (F3) button. The jukebox enters still image preview.
• Wait a second or two to let the exposure parameters stabilize.
• Press the “Click” (F3) button to take the picture.
Camera Setup Parameters:
• Press “Setup” (F2) button. The still image setup menu appears.
• Use UP and DOWN to select a parameter to adjust.
• “Change name”: Allows you to change the name of a still image
file. By default, image files are stored in the current folder
(directory) with the name IMG.xxx.jpg (xxxx is incremented
automatically starting from 0000).
• “Zoom”: use “>>”or “<<” arrow keys to select 1X or 2X digital Zoom.
• “Img size”: use “>>”or “<<” arrow keys to select 1280x1024 or 640x480 image resolution.
• “Exposure”: use “>>”or “<<” arrow keys to select between “Normal”, “Darker”, and “Brighter”.
• “White Bal.”: The jukebox camera uses an automatic white balance algorithm. This algorithm needs to
assume some light spectrum composition to make accurate adjustments of the color channels. The light
spectrum type can be chosen “Auto” (automatic setting), “Daylight”, “Tungsten” (for normal indoor lighting)
and “Fluorescent” (for indoor fluorescent lighting).
• “Settings”: Gives access to the general settings menu.