


43
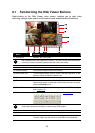
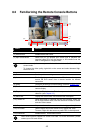
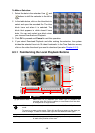
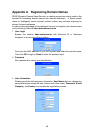
8.2 Familiarizing the Remote Console Buttons
(1) (3) (7)(6)(5)(4)
(8)
(9)
(11)
(12)
(2)
(10)
(13)
Name Function
(1) Exit Close the Remote Console.
(2) Audio button Enable/disable the sound.
(3) Split Screen Mode Select from six (6) different split screen type to playback the
recorded video file of all the camera, or one camera over the
other or alongside on a single screen.
i
- If there are only 4 cameras, you won’t be able to switch to 9, 16, and 13 split
screen mode.
- To change the video quality, right-click on the screen and select between High,
Normal or Low.
(4) Record Start/stop video recording.
(5) Network Enable/disable remote system access. This feature allows you to
access EB DVR server from a remote location via internet
connection.
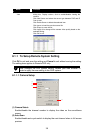
(6) Setup Configure the Remote Console setting. (see also Chapter 8.2.1)
(7) Preview Switch to Preview/Playback mode. This allows you to view live
camera display.
(8) Playback Switch to Playback mode. This allows you to view the recorded
video file. (see
Chapter 8.3)
(9) Status Bar Display the current date, time and hard disk free space.
(10) Camera ID Show the number of cameras that are being viewed. When you
are in single screen mode, click the camera ID number to switch
and view other camera.
(11) Snapshot Capture and save the screen shot either in *.jpg or *.bmp format.
(12) Full screen Use the entire area of the screen to only display the video.
To return, Right click the mouse or press ESC on the keyboard.
(13) DirectDraw Enable/disable DirectDraw function
i
Direct Draw function supports for certain VGA card. For more information, please
contact your VGA card vendor.