


AXIS P3225-LVE Network Camera
Access the Product
Set Power Line Frequency
Power line frequency is set the rst time the Axis product is accessed and can only be changed from Plain Cong (see page 56)
or by resetting the product to factory default.
Select the power line frequency (50 Hz or 60 Hz) used at the location of the Axis product. Selecting the wrong frequency may cause
image icker if the product is used in uorescent light environments.
Note
Power line frequency varies depending on geographic region. The Americas usually use 60 Hz, whereas most other parts of
the world use 50 Hz. Local variations could apply. Always check with the local authorities.
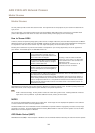
The Live View Page
The controls and layout of the Live View page may have been customized to meet specic installation requirements and user
preferences. Consequently, some of the examples and functions featured here may differ from those displayed in your own Live View
page. The following provides an overview of each available control.
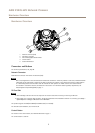
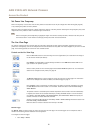
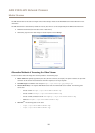
Controls on the Live View Page
Click the View size buttons to show the image in full size (right button) or to scale down the image to
t the browser window (left button).
Click WDR on to enable WDR in intense backlight conditions. Click WDR off to disable WDR in low
light conditions for optimal exposure.
Select a stream prole for the Live View page from the Stream Prole drop-down list. For information
about how to congure stream proles, see page 20.
The Manual Trigger button is used to trigger an action rule from the Live View page. For information
about how to congure and enable the button, see Manual Trigger on page 11.
Click Snapshot to save a snapshot of the video image. This button is primarily intended for use when
the AXIS Media Control viewer toolbar is not available. Enable this button from Live View Cong >
Action Buttons.
The product’s heater is controlled by the ambient temperature and is turned on and off automatically.
If required, the heater can be activated manually by clicking the Heater button. To show the button,
go to Setup > Live View Cong. Under Action Buttons, select Show heater button and specify the
number of minutes the heater should be activated.
Activate or de-activate IR illumination from Setup > Video > Camera Settings. Enable this button from
Live View Cong > Action Buttons.
Move the slider to increase or decrease the intensity of the LEDs.
Manual Trigger
The Manual Trigger is used to trigger an action rule from the Live View page. The manual trigger can for example be used to
validate actions during product installation and conguration.
To congure the manual trigger:
1. Go to Setup > Events.
11