


AXIS Q1602-E/AXIS Q1604-E Installation Guide Page 9
ENGLISH
Notes:
• Using any other than the provided cable gland may cause water to seep in and damage the product.
• Always use a shielded network cable (STP) intended for outdoor use between the Axis product and
the end point and ensure that the end point is properly grounded. Installations of Axis products using
a shielded network cable (STP) and a properly grounded end point have been tested to comply with
industry immunity standards’ levels such as surge protection. Any other installation method will void
the warranty and leave the unit at a risk.
• An optional cable with a diameter of 4.0 mm - 5.5 mm should be routed through a separate cable
gland (see
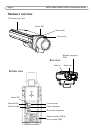
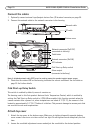
Hardware overview
).
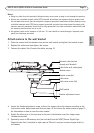
Attach camera to the wall bracket
1. Place the camera with the bottom cover on the wall bracket and tighten the bracket screws.
2. Replace the cable cover and tighten the screws.
3. Connect the cables. See
Connect the cables,
on page 10.
4. Loosen the bracket adjustment screw to focus the camera; focus the camera according to the
instructions under
Adjust zoom and focus,
on page 16. See
Access the video stream,
on page 15
for information on how to view the video stream.
5. Attach the safety wire in the top cover to the tab in the bottom cover (see image under
Hardware overview
).
6. Optionally insert an SD memory card (not included) into the SDHC (Secure Digital High
Capacity) card slot. A standard or high capacity SD card is required to store images locally in
the camera.
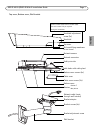
Cable cover
Bracket screw (4x)
Cable cover screw (2x)
Network cable (routed
Wall bracket
Bracket adjustment screw
through wall bracket)
Cable holes with cable gland
Bottom cover