


AXIS Q1615-E Network Camera
Set Up the Product
Focus Assistant
Note
• The view in front of the camera should not be changed during focus adjustment (steps 5 and 6). If the camera is moved, or if
a nger or other object is placed in front of the lens, steps 3 - 7 will have to be repeated.
• If movements in front of the camera cannot be avoided, the Focus Assistant should not be used.
• If the camera is mounted so that the Function button cannot be accessed, you can still use the Focus Assistant. Follow the
instructions above but mount the camera after step 4, pressing the Function button instead and skip step 7.
To focus your network camera using the Focus Assistant, follow steps 1 - 3 on page 20 before you start with the steps below.
See Hardware Overview on page 6 .
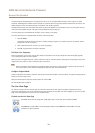
1. Mount or place the camera so that it cannot be moved.
2. Loosen the zoom puller by turning it counter-clockwise. Move the puller to set the zoom level. Re-tighten the zoom puller.
3. Set the camera to its extreme distant-focus position by loosening the lock screw for the focus ring and turning the
focus ring fully counter-clockwise.
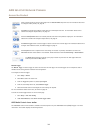
4. Press and quickly release the Function button. When the Status LED ashes green, the Focus Assistant is enabled.
If the Status LED ashes either red or amber before you are able to adjust the lens, skip to step 7 to exit the Focus Assistant
and repeat steps 3 - 7. See the notes above. See Status LED Behavior for Focus Assistant on page 10.
5. Gently turn the focus ring clockwise until it stops.
6. Turn the focus ring slowly counter-clockwise until the status indicator ashes green or amber (not red).
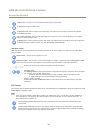
7. To exit the Focus Assistant, press the Function button again. The Focus Assistant is switched off automatically after
15 minutes.
8. Retighten the lock screw for the focus ring.
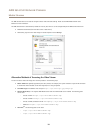
9. Open the Live View page in the web browser and check the quality of the image.
10. On the Focus page, click Fine-tune focus automatically and wait until automatic ne tuning is completed.
11. Click Enable iris. If the button is inactive the iris is already enabled.
12. If needed, make further adjustments under the Advanced tab. See the online help for more information.
21