


AXIS Q87-E Installation Guide Page 15
ENGLISH
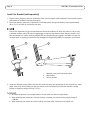
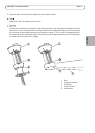
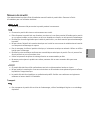
4. Attach the top cover to the bottom cover. Make sure to tighten diagonally opposite bottom cover screws a few
turns at a time until all are tight (torque 4 Nm). This will help ensure that the bottom cover gasket is
compressed evenly.
5. Attach the sunshield to the top cover.
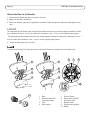
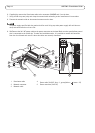
6. Loosen the counterweight locking screws and adjust the position of the weights to the desired position. The
positions of the weights must be identical.
Note:The pan/tilt assembly must remain balanced for the pan/tilt function to operate correctly. Check the
balance by swinging the housing slightly.
7. Remove the protective plastic from the protective window.
6
8
11
10
7
9
2
1
3
4
5
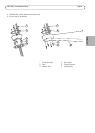
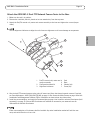
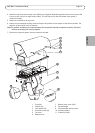
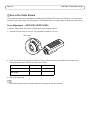
1 Sunshield 7 Bottom cover screw (10x)
2 Washer (4x) 8 Counterweight
3 Lock washer (4x) 9 Counterweight locking screws
4 Sunshield screw (4x) 10 Positioning holes
5 Top cover 11 Protective plastic
6 Bottom cover