


14 en | Installation VIP X1600 B
F.01U.081.492 | V4.0 | 2008.04 Installation and Operating Manual Bosch Security Systems
4.3 Installing in a Switch Cabinet
4.3.1 Preparations
The VIP X1600 B is set up for installation in a 19-inch rack. The necessary installation
equipment is included in the scope of delivery.
When installing in a switch cabinet, ensure that the screw joints are free of tension and
subject to as little mechanical stress as possible. Ensure that the unit and the power supply
units have sufficient grounding.
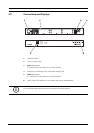
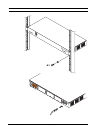
4.3.2 Installing and Connecting the VIP X1600 B
1. Prepare the switch cabinet in such a manner that you are easily able to insert the
VIP X1600 B directly at the installation point.
2. Place the cage nuts in the corresponding drillings or spaces in the switch cabinet frame.
3. Lift the VIP X1600 B into the switch cabinet frame and insert the fastening screws
together with the washers.
4. Tighten the screws one after the other and then check once more that all the screws are
tight.
5. Connect one or two power supply units to the sockets on the rear of the housing and
hand tighten the coupling nuts for the plug.
!
CAUTION!
When installing in a switch cabinet, ensure that there is sufficient ventilation for the unit.
There must be at least 5 cm (1.97 in.) of free space to the left and right of the unit and at least
10 cm (3.94 in.) at the rear.
The VIP X1600 B generates heat during operation. During installation, please note the
maximum heat value of 170 BTU/h.
When mounting additional units, direct contact with the VIP X1600 B is permitted, provided
that the surface temperature of the adjacent units does not exceed +50 °C (+122 °F).
!
CAUTION!
Only use power supply units approved by Bosch Security Systems.