


95
Custom Picture Settings
4 Select [OK] and then press the joystick.
• The file in the camcorder will be overwritten by the one on the SD card. When the confirmation screen
appears, press the joystick.
5 Press the CUSTOM PICTURE button to exit the custom picture menu and apply the selected custom picture
settings.
Copying a File from an SD Card to the Camcorder
1 After selecting a file on an SD card, open the [Copy To Cam.] submenu.
[+/Transfer File] > [Copy To Cam.]
2 Select the file slot under which to save the file and then press the
joystick.
3 Select [OK] and then press the joystick.
• The currently selected file will be copied to the selected slot on the camcorder, overwriting the file in that
slot. When the confirmation screen appears, press the joystick.
4 Press the CUSTOM PICTURE button to exit the custom picture menu and apply the selected custom picture
settings.
Replacing a File on an SD Card with a File in the Camcorder
1 After selecting a file on an SD card to replace, open the [Load From
Cam.] submenu.
[+/Transfer File] > [Load From Cam.]
2 Select the file to transfer to the SD card and then press the joystick.
3 Select [OK] and then press the joystick.
• The file on the SD card will be overwritten by the one in the camcorder. When the confirmation screen
appears, press the joystick.
4 Press the CUSTOM PICTURE button to exit the custom picture menu and apply the selected custom picture
settings.
NOTES
• You can also copy a custom picture file embedded in a photo to the camcorder (A 131).
Available Custom Picture Settings
The following are the available settings. Even if no custom picture file is selected, the default settings are still
applied to the picture.
[Gamma]
The gamma curve changes the overall look of the image. Generally, this should be the same setting as [Select]
under [Color Matrix]. (Default: [Normal 1]).
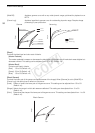
[Normal 1] to [Normal 4]: These settings are suitable for viewing the image on a TV monitor. Highlights in [Normal
2] are brighter than those of [Normal 1]. Dark tones in the lower part of the gamma
curve for [Normal 3] (ITU-R BT.709 standard) and [Normal 4] are more pronounced than
those of [Normal 2].
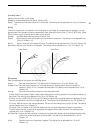
[Cine 1] or [Cine 2]: Use [Cine 1] for a gamma curve that results in a picture with a cinema-like feel and
cinema-like tones. [Cine 2] has softer contrasts than does [Cine 1] but is also suitable
for creating a cinema-like picture.
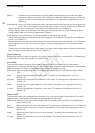
[EOS Std.]: This gamma curve approximates the look of an EOS digital SLR camera when the
picture style is set to [Standard] (high contrast, vibrant colors).
[+/Transfer File]
[Copy To Cam.]
[+/Transfer File]
[Load From Cam.]
COPY