


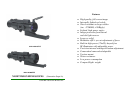
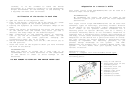


The front and rear feet (2,3) with transverse screws (6)
are standard feet with standard prism (4). They are produced
by the companies manufacturing scopes mounts (for example,
Ernst Apel Gmbh, Germany)).
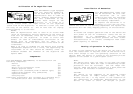
The following types of rails are recommended:
SP200-64 - for the device NVD-NORS210
with objective 64mm,
SP200-100 - for the device NVD-NORS220
with objective 100mm or NVD-NORS210 +
2x Magnification Lens.
NOTE.
The rails SP200-64, SP200-100 move the device back.
This is necessary for some rifles for comfortable
use.
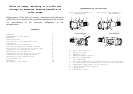
Adaptation of the device is performed in consistency with
the following rules:
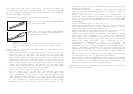
- Check the elevation of the fastening screws (5), pulling
the rail (4) to the body of the device (1) above the
upper surface of the rail. The height of elevation must
not exceed 3.0mm and must not be less than 2.5mm. It is
especially important when the body of the device has a
blind aperture with a thread (front hole for the device
with a 64mm objective). The elevation should not exceed
3.5mm for through holes and should not be less than
2.5mm. This requirement can be met by cutting axle length
of the screws from the side of the thread;
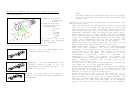
- Screw off screws (6) from feets (2,3);
- Fix the feets (2,3) to the rail (4). Fasten the feets
(2,3) to the rifle. Moving the rail in the feets find
such a position of the device when your eye reaches the
edge of the Eyepiece Guard or in case of a large caliber
(for example, .375 H&H Mag) your eye should be situated
at the distance of 2-5cm from the edge of the rubber
eyepiece Guard. The device should be located in the
position which allows comfortable observation without
stretching forward;
- Screw the screws (6) in supports (2,3) from the opposite
side to fix the selected position of supports (2,3) at
the rail (4);
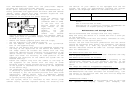
- Drill the rail(4)at the place of disposition of
screws(6) using supports (2,3)as conductor. Control the
depth of drilling not to damage screws (it is desirable
to use a special accommodation of the firm Ernst Apel
(Ref.22000));
- Cut an excessive part of the rail (4);
- Screw off screws(6) and twirl them in regular position
into perforated holes through supports (2,3). Fasten
screws (6) with the fixed composition;
- Remove fat from the surface (A)of the rail and from the
body of device at the place that will be glued;
- Prepare the glue (glue is needed, for example, epoxy
with the tear strength not less than 200kg/cm
2
)
according to its preparation instruction, and put it on
the surface (A) of the rail. The surface of the screws
should not have any glue. This condition is of a
considerable importance, since it provides an
opportunity to repair the device and remove the
alignment rail for further adaptation to another rifle;
- Apply a hermetic substance (of silicone type) on the
thread of the screws (5). It is necessary to exclude the
hit of moist air into the device and to avoid sweat of
it;
- Fix the rail (4) to the body of the scope with the help
of the screws (5) cut at the required length;
- Remove glue surpluses appeared in the place of alignment
of the plate with the body with a dry napkin and let the
glue solidify in accordance with its instruction (for
example, 24 hours in case of epoxy glue).
Adaptation has been completed and the device is ready for
use as a hunter’s scope.