58
Recording Movie Images and Audio
1. While a movie is being recorded, press the shutter button.
Movie recording continues after the snapshot is recorded.
NOTE
• You can use [2] ( ) while shooting a movie to change the flash mode setting.
• Movie recording is interrupted for a few seconds at the point where a snapshot is
recorded.
• During movie recording, shooting a snapshot with any of the following is not
possible.
– Premium Auto
– A, S, or M mode (dial-selected recording mode)
– Some BEST SHOT scenes
Voice Recording lets you record audio only, without a snapshot or movie.
• For information about Voice Recording capacities, see page 177.
1. In the REC mode, set the mode dial to b (BEST SHOT).
2. Press [SET].
3. Use [8] and [2] to select the bottom Control Panel option (BS) and
then press [SET] (page 33).
4. Use [8], [2], [4], and [6] to select the “Voice Recording” scene and
then press [SET].
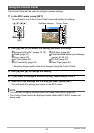
This causes ` to appear on the monitor screen.
5. Press the shutter button to start recording.
• The back lamp flashes green while recording is in
progress.
• Pressing [SET] during recording will insert a
marker into the recording. During playback, you
will be able to jump to the markers in the recording.
6. Press the shutter button again to stop audio
recording.
• To create another audio recording file, repeat
steps 5 and 6.
• To turn off Voice Recording, set the mode dial to
t (Auto).
Shooting a Snapshot while Shooting a Movie
Recording Audio Only (Voice Recording)
Recording time
Remaining recording
time