96
Using the Camera with a Computer
4. Turn off the camera and
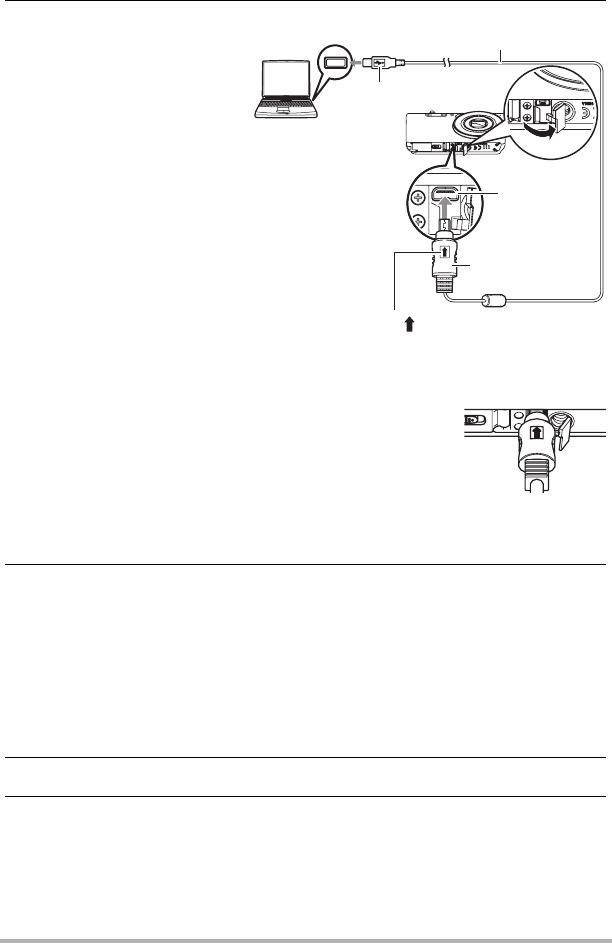
then use the USB cable
that comes with the
camera to connect it to
your Macintosh.
• Connecting the camera to
a computer with a USB
cable starts charging of
the camera’s battery
(page 17).
• Make sure that you insert
the cable connector into
the USB/AV port until you
feel it click securely into
place. Failure to insert the
connector fully can result
in poor communication or
malfunction.
• Note that even while the connector is fully inserted, you
still will be able to see the metal part of the connector as
shown in the illustration.
• When connecting the USB cable to a USB port, make
sure you align the connector correctly with the port.
• Your computer may not be able to recognize the camera
if you connect via a USB hub. Always connect directly to
the computer’s USB port.
5. Turn on the camera.
The camera’s back lamp will light green or amber at this time. In this mode, your
Macintosh recognizes the memory card loaded in the camera (or the camera’s
built-in memory if it does not have a memory card loaded) as a drive. The
appearance of the drive icon depends on the Mac OS version you are using.
• The first time you connect the camera to your Macintosh with the USB cable,
an error message may appear on your computer. If this happens, disconnect
and then reconnect the USB cable.
• Charging continues even if the camera is turned on.
6. Double-click the camera’s drive icon.
7. Drag the “DCIM” folder to the folder to which you want to copy it.
USB port
USB cable
(included with camera)
[USB/AV] port
Large connector
Small connector
Making sure that the mark on the USB cable
connector is towards the lens side, connect the
cable to the camera.


