


109
Printing
You can connect the camera directly to a printer that supports PictBridge and print
images without going through a computer.
. To set up the camera before connecting to a printer
1. Turn on the camera. Next, press [SET] and then display the REC menu
(page 63) or the PLAY menu (page 90).
2. On the “Set Up” tab, select “USB” and then press [6].
3. Use [8] and [2] to select “PTP (PictBridge)”, and then press [SET].
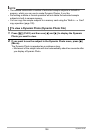
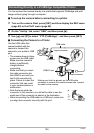
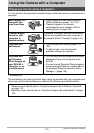
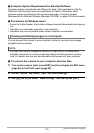
. Connecting the Camera to a Printer
Use the USB cable that
comes bundled with the
camera to connect the
camera to your printer’s USB
port.
• The camera does not draw
power over the USB cable.
Make sure the camera’s
battery is sufficiently
charged before
connecting.
• Make sure that you insert
the cable connector into
the USB/AV port until you
feel it click securely into
place. Failure to insert the
connector fully can result
in poor communication or
malfunction.
• Note that even while the
connector is fully inserted, you still will be able to see the
metal part of the connector as shown in the illustration.
• When connecting the USB cable to a USB port, make sure
you align the connector correctly with the port.
Connecting Directly to a PictBridge Compatible Printer
USB cable
USB port
Small connector
Making sure that the 4 mark on the USB cable
connector is towards the monitor screen side, connect
the cable to the camera.
Large connector
USB/AV port