


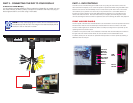
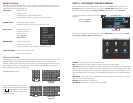


PART 3 - CONNECTING THE DVR TO YOUR DISPLAY
DC 12V
AUDIO/VIDEO/NET
1 2 3 4 NO C A B Rx Tx
NOTE! You may use both the built-in monitor and a connected monitor
simultaneously with this DVR. The image on the external display will be
identical to that on the built-in screen.
To Connect to a VGA Monitor:
You will need to purchase a BNC to VGA converter box (depending on model, you may
also need a BNC(F) to BNC(F) cable). Connect the converter to the Video Out plug on
the dongle and then to a monitor using a VGA cable.
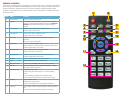
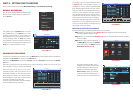
This DVR can be controlled through the USB mouse or by using the the remote control. We
have found that the majority of our customers prefer to operate their DVRs using the USB mouse
because of its ease of use and flexibility and our manual is set up with this in mind. The remote
control allows you to perform most of the day-to-day functions from a convenient distance. It
functions as a typical remote control with additional buttons allowing you to navigate through
menus and control functions. We recommend that you configure your DVR using the mouse
controls, reserving the remote control for operations such as live viewing, file search and playback.
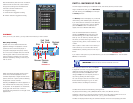
PART 4 - DVR CONTROLS
FRONT AND SIDE PANELS
The front panel of the DVR has minimal features to aid in discretion. The most important item is the
Infrared sensor window. This should be kept unobstructed if the remote control is to be used.
The two indicator lights show whether the DVR is currently recording and if it is powered up and
operating even if the screen is dark.
In addition to the ports located on the underside of the DVR, there are twin USB ports located on
the right side of the monitor frame. Either one can be used for the included USB mouse.
In addition, either port can be used to upload firmware updates or to back up files by inserting a
USB flash drive into the port.
USB
Ports
Power
Switch
Infrared
Remote
Receiver
Window
Recording
Indicator
Power
Status