


PART 6 - SETTING DVR TO RECORD
There are two modes for recording: Manual Recording and Scheduled Recording.
MANUAL RECORDING
You can get to the Manual Record menu by right
clicking on the screen with the mouse and se-
lecting Record.
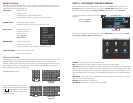
This will take you to the Record menu. You can
click the All option on the Manual row to start
recording on all channels, or you can select only
the cameras that you want to begin recording.
To stop recording, select the Stop option under
each camera to cause that camera to cease re-
cording, or you can selecting the All option in the
Stop row to cause all cameras to stop.
View 1
View 4
Color Setting
Search
Record
Main Menu
SCHEDULED RECORDING
To record on a schedule you will need to get to the Record menu as described above and select the
cameras on the Schedule row instead of the Manual row.
Next, go to the Main Menu, and click on Settings, and select Schedule. This will open the Sched-
ule menu.
The DVR is programmed with all cameras set to record constantly by default. You may set up your
own schedule to meet your specific requirements.
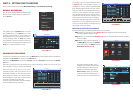
SCHEDULE
Channel
Week Day
Period 1
Period 2
Period 3
Period 4
Period 5
Period 6
PreRecord sec.
Record Type Regular MD Alarm MD/Alarm
Regular
Wed
1 4
00 :00 -24 :00
00 :00 -24 :00
00 :00 -24 :00
00 :00 -24 :00
00 :00 -24 :00
00 :00 -24 :00
Copy Paste Default Save Cancel
MD Alarm MD/Alarm
0 3 6 9 12 15 18 21 24
There are six blocks of time you can use to
schedule recording and each camera can be
individually configured or they all may share the
same schedule. In addition, you may set up indi-
vidual schedules for each day, or you may share
the same schedule across every day.
Cameras may be scheduled to record in different
modes at different times of the day.
PICTURE 6-1
PICTURE 6-2
PICTURE 6-3
PICTURE 6-4
PICTURE 6-5
PICTURE 6-6
An example of such a mixed schedule is shown
in Picture 6-4. In this example, Camera 1 is
scheduled to record if motion is detected (MD)
from midnight to 8am and then records continu-
ously from 8am to noon (Regular) followed by a
one-hour motion detection recording segment
until 1pm before returning to continuous record-
ing after that. Then, at the end of the day, it is in
motion detection mode from 5pm to midnight.
The scale running along the bottom of the menu
ranges from 0 to 24, representing the hours of
a day. You can set starting and ending times to
any specific minute you choose.
SCHEDULE
Channel
Week Day
Period 1
Period 2
Period 3
Period 4
Period 5
Period 6
Wed
1 4
00 :00 -08 :00
08 :00 -12 :00
12 :00 -13 :00
13 :00 -17 :00
17 :00 -24 :00
00 :00 -24 :00
Copy Paste Default Save Cancel
PreRecord sec.
Record Type Regular MD Alarm MD/Alarm
Regular
MD Alarm MD/Alarm
0 3 6 9 12 15 18 21 24
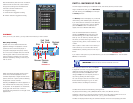
MOTION DETECTION RECORDING
There are three steps to scheduling the DVR to record on motion.
STEP 1. Return to the Record menu (Picture 6-2) and designate which cameras will be
recording in Motion Detection mode.
STEP 2. Next, go to the Schedule (Picture 6-3) menu as described above and set schedule
for each camera.
STEP 3. After setting up the schedule go to
the Main Menu and select the Setting
menu. Inside, select the Detect window
(Red square in Picture 6-5)
The Detect window will allow you to
configure your camera and the actions
the DVR will perform when motion is
detected. Under Event Type select
Motion Detect, Select your Channel,
or All, and select the enable option to
enable the camera for motion detection.
DETECT
Event Type
Enable
Region
Period
Delay
Show Message Alarm upload Send Email
Record Channel
Tour
Snapshot
Buzzer
Anti-dither sec.
Channel
Sensitivity
Motion Detect 1
3
0
sec.
10
Select
Set
Copy Paste Default Save Cancel
1 2 3 4
1 2 3 4
1 2 3 4
OK Cancel
RECORD
Record Mode All 1 2 3 4 5 6 7 8
Schedule
Manual
Stop