


- 22 -
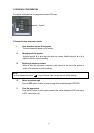
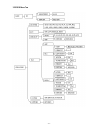
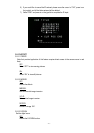
3.3 LENS
1. When the SETUP menu is displayed on the screen, please direct the arrow to point to “LENS” by
moving the joystick UP and DOWN.
2. Select “RET” to save all settings in the LENS menu and returns to the previous menu.
Select “END” to save all the menu settings and exit from the OSD menu.
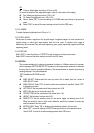
3.4 EXPOSURE
When the SETUP menu is displayed, direct the arrow to EXPOSURE and press in on the joystick.
3.4.1 SHUTTER
1. When the EXPOSURE menu is displayed on the screen, please direct the arrow to point
“SHUTTER” by moving the joystick UP or DOWN.
2. Select the shutter mode by moving the joystick LEFT or RIGHT.
Select from x256, x128, x64, x32, x16, x8, x4, x2, 1/60, FLK, 1/125, 1/500, 1/2000, 1/5000,
1/10000, 1/00000.
FLK:
Please select “FLK” mode if flickering occurs on the screen, because of an irregular balance
between illumination and scan frequency. NTSC model: 1/100, PAL model: 1/120.
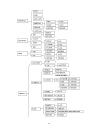
3.4.2 AGC (Auto Gain Control)
1. Please direct the arrow to point to “AGC” by moving the joystick UP and DOWN.
2. Select the mode you would like to operate by moving the joystick LEFT or RIGHT. The more the
level of gain increases, the brighter the screen; however, the level of noise increases as well.
Please select from HIGH, MIDDLE, LOW and OFF.
3.4.3 SENSE-UP
SENSE-UP is used to keep a brilliant, vivid screen image by automatically detecting changes in the
level of light under low light level conditions.
1. Please direct the arrow to point to “SENSE-UP” by moving the joystick UP and DOWN.
2. Select the mode you would like to operate by moving the joystick LEFT or RIGHT.
AUTO:
Low light level auto mode.
OFF:
The function is disabled.
NOTE:
The brightness of the screen can be adjusted in the BRIGHTNESS sub menu. The level can be
adjusted from 0 to 100.