


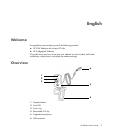


HP Webcam User’s Guide 5
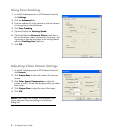
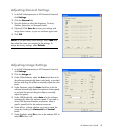
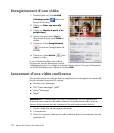
Adjusting General Settings
1 In ArcSoft VideoImpression or HP Photosmart Essential,
click Settings.
2 Click the General tab.
3 Drag the sliders to adjust the Brightness, Contrast,
Gamma, Saturation, or Sharpness levels.
4 (Optional) Click Save As to store your settings and
assign them a name, so you can use them again later.
5 Click OK.
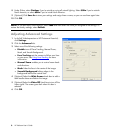
Adjusting Image Settings
1 In ArcSoft VideoImpression or HP Photosmart Essential,
click Settings.
2 Click the Image tab.
3 Under White balance, select the Auto check box to let
the software automatically detect color levels, or uncheck
the box and drag the sliders to manually adjust the color
levels.
4 Under Exposure, select the Auto check box to let the
software automatically detect the optimum shutter speed,
or uncheck the box and drag the slider to manually
adjust the speed.
5 Under USB Bandwidth, select Auto to let the software
automatically detect the optimum speed. If you need to
share USB resources between accessories, select a
specific speed limit for the webcam resources.
6 Under Mirror, indicate whether you want to rotate the
image by checking the Horizontal and Vertical
boxes.
7 Under Spotlight, select On to turn on the webcam LED, or
select Off to turn it off.
NOTE: To use previously saved settings, select Load and
then select the name you assigned to the settings. To
restore the factory settings, select Default.