


Getting Started
15
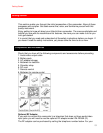
A power source must be connected to the camcorder before a cassette can be inserted
or removed.
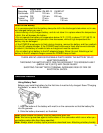
15. Cassette Holder Close Button
CAUTION: Be sure to press this button to close the cassette holder. Otherwise, the tape
may become slack and may be damaged.
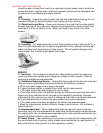
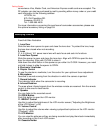
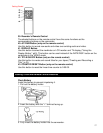
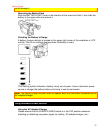
Rear Illustration
16. INST. ZOOM (Instant Zoom) Button
Use this button to magnify the image being recorded 1.5 times.
17. EIS (Electronic Image Stabilizer) Button (only for VM-E635LA)
EIS corrects the slight shaking of an image ("Using the Electronic Image Stabilizer,"
p39).
18. D.EFFECT Button
Use this button to add special effects to your recording. You can select five modes - the
16x9 mode, negative/positive mode, X130 digital zoom mode, half-mirror mode and
mosaic mode. (See "Digital Effects Recording" on page 36.)
19. FADE Button
The FADE button features four modes; white fade, wipe fade, zoom fade and black-and-
white fade ("Using Fade," p38).
20. DATE/DISP. Button
When the CAM/OFF/VIDEO switch is set to CAM, this button cam be used as the DATE
button: set the date and time, and select the date display you want to record ("Setting
the Date and Time", p22 and "Date Recording", p35).
In the VIDEO mode, the DATE/DISP. button is used as the DISPLAY button (Using the
Display Button", p40).
Note: Be sure to insert the clock battery before setting the date and time or creating a title.
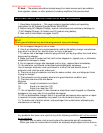
21. FOCUS Control Buttons
Press these buttons simultaneously to select manual or automatic focus. For manual
focusing ("Using Manual Focus", p26), press the or buttons to bring the subject
into focus. When using manual focus, "FOCUS" appears in the viewfinder or LCD
monitor.
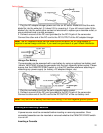
22. DC IN Jack
When using the AC adapter/charger, connect one end of the DC cord (provided) to this
jack and the other end to the DC OUT jack of the AC adapter/charger. When using the
car battery cord (optional), connect this jack and the DC OUTPUT jack of the car battery
cord.
23. AUDIO/VIDEO Output Jacks (Behind the jack cover)
Use this jack to connect the camcorder to a VCR or television. ("Playing Back Your
Recording", p30, 31, "Dubbing from the camcorder to a VCR". p45).
• Connect the yellow plug of the audio/video cable to the yellow jack (VIDEO OUT) and
the white jack (AUDIO OUT).
24. Power Supply Attachment Section
Attach the battery here ("Camcorder Batteries", p16).
25. Shoulder Strap Slots
Attach the shoulder strap here.
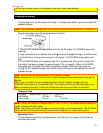
Right side/Underside Illustration