


11
BASIC FEATURES
• If your TV/VCR has a 21-pin connector, use
the provided Cable Adapter.
1) Connect the camcorder and the VCR (੬pg.
10, “Connections To A TV/VCR”). Set the
Power Switch
#
to “PLAY” while pressing
down the Lock Button
"
, turn on the VCR’s
power, and insert the appropriate cassettes in
the camcorder and the VCR.
Engage the VCR’s AUX and Record-Pause
modes.
2) Press 3/8
&
to find a spot just before the
edit-in point. Once it is reached, press 3/8
&
again.
3) Press 3/8
&
and engage the VCR’s Record
mode.
4) Engage the VCR’s Record-Pause mode and
press 3/8
&
.
• Repeat steps 2) through 4) for additional
editing, then stop the VCR and camcorder
when finished.
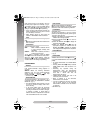
Use this to play back a VHS-C video cassette
recorded with this camcorder on a VHS VCR.
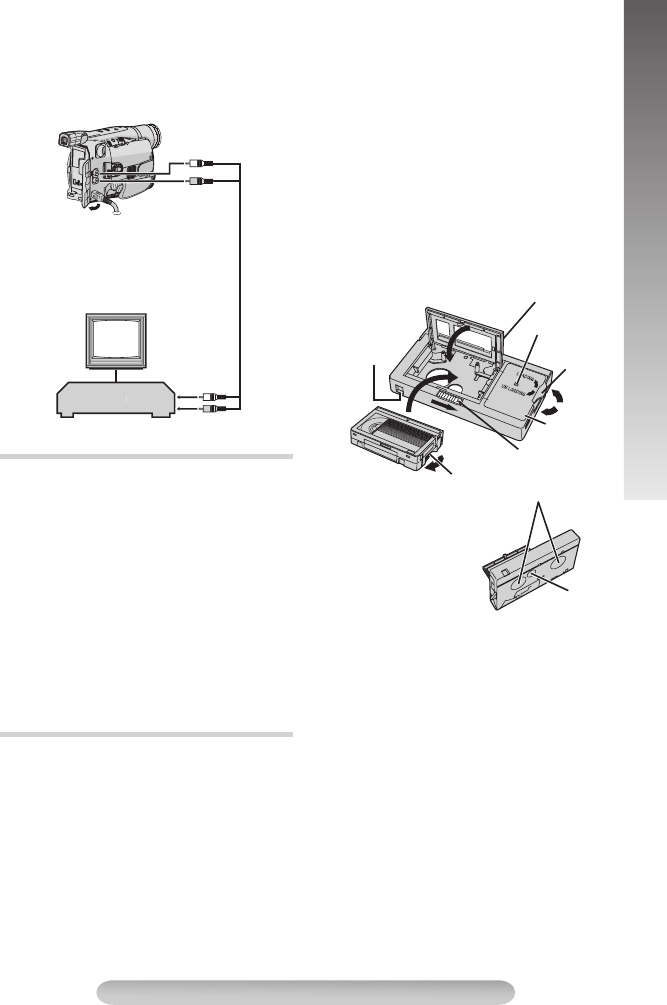
1) Slide the latch 1 to open the compartment
door, then insert the cassette and close the
compartment door 2.
• If the colour shown in the window 4 is green
or red, turn the dial 5 in the direction of
"UNLOADING" so that colour changes to blue.
2) Turn the dial 5 in the direction of "LOADING"
all the way until it stops.
• The color shown in the window 4 changes
from blue \ red \ green (indicating playback
is possible).
3) Load the cassette adapter into the VCR and
play the tape back.
• To record on a VCR using a compact cassette
and the adapter, cover the adapter’s recording
safety hole with Adhesive tape.
4) To unload the cassette, turn the dial 5 in the
direction of "UNLOADING" all the way until it
stops.
• The color shown in the window 4 changes
from green \ red \ blue (indicating
unloading is possible).
5) Slide the latch 1 to open the compartment
door, then insert your finger in the hole 6, and
push up and remove the cassette.
6) Close the compartment door 2.
• If there is slack in the video tape when
inserting the compact cassette into the
adapter, the tape may become damaged. To
take up slack in the tape, turn the gear 3 in
the direction of the arrow.
• During tape loading and unloading, do not
touch the reels 7 for safety and tape
protection.
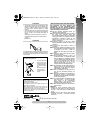
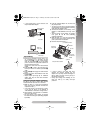
Tape Dubbing
Using The Cassette Adapter (Optional)
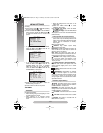
T
V
VCR
White to Audio
Output
6
Yellow to Video
Output
7
Connector cover
A/V cable
White to
Audio Input
Yellow to
Video Input
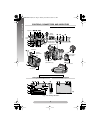
2 Compartment door
7 Reels
4 Window
5 Dial
1 Latch
6 Hole
3 Gear
Compact video cassette
The protec-
tion sheet is
affixed
Recording
safety hole
GR-FXM41EN(EK).fm Page 11 Monday, November 8, 2004 10:03 AM