


34
EDITING
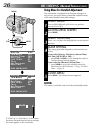
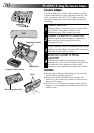
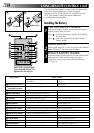
Tape Dubbing
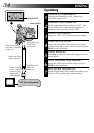
CONNECT EQUIPMENT
1
Following the illustration at left, connect the
camcorder and the VCR.
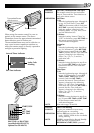
PREPARE FOR DUBBING
2
Set the camcorder’s Power switch to “PLAY”, turn
on the VCR’s power, and insert the appropriate
cassettes in the camcorder and the VCR.
SELECT VCR MODE
3
Engage the VCR’s AUX and Record-Pause modes.
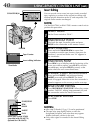
FIND EDIT-IN POINT
4
Engage the camcorder’s Play mode to find a spot
just before the edit-in point. Once it’s reached, press
PAUSE on the camcorder.
START EDITING
5
Press PLAY on the camcorder and engage the VCR’s
Record mode.
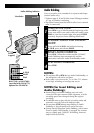
STOP EDITING TEMPORARILY
6
Engage the VCR’s Record-Pause mode and press
PAUSE on the camcorder.
EDIT MORE SEGMENTS
7
Repeat steps 4 through 6 for additional editing, then
stop the VCR and camcorder when finished.
PLAY/PAUSE
Power switch
To AUDIO and
VIDEO OUT
connectors
When connecting
the cables, open the
jack cover.
VCR (Recording deck)
To AUDIO and
VIDEO IN
connectors
If your TV/VCR
has the SCART
connector, use
the provided
cable adapter.
Audio and Video
cable (optional)