


EN 73
1
!
@
#
$
%
^
r
2
4
5
6
7
8
9
0
t
yu
i
opQ
MENU
BRIGHT
IND/DISPLAY
3
W E
&
*
(
q
w
e
)
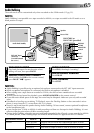
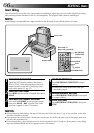
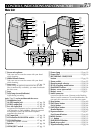
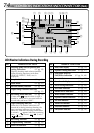
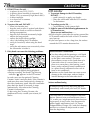
CONTROLS, INDICATIONS AND CONNECTORS
Main Unit
% Power lamp ....................................... ੬ pg. 19
^ Power Dial ........................................ ੬ pg. 19
& RECORDING START/STOP
button................................................
੬ pg. 19
* Zoom switch...................................... ੬ pg. 25
( Shooting mode selector......................੬ pg. 18
) SP-LP recording mode button ............੬ pg. 14
q SNAPSHOT button............................ ੬ pg. 26
w Battery cover open switch..................੬ pg. 9
e Battery cover ..................................... ੬ pg. 9
r Multi connector
Located inside the cover. Connect to the Docking
Station’s multi connector. To avoid malfunction, do
not touch this connector or force the cover open.
t Stop button........................................ ੬ pg. 49
y Play/Pause button ............................. ੬ pg. 49
Focus button......................................
੬ pg. 46
u P.AE/Effect button.............................. ੬ pg. 34
Rewind button...................................
੬ pg. 49
i Exposure button ................................ ੬ pg. 47
Fast-Forward button ..........................
੬ pg. 49
o MENU button .................................... ੬ pg. 12
p –/+ button ......................................... ੬ pg. 12
Q IND/DISPLAY button ........................ ੬ pg. 23
W Hand strap eyelet .............................. ੬ pg. 14
E Tripod mounting socket......................੬ pg. 16
1 Stereo microphone
Take care not to cover the sensor with your hand
while shooting.
2 White Balance Sensor
Take care not to cover the sensor with your hand
while shooting.
3 Lens cover ......................................... ੬ pg. 14
When using an optional conversion lens or lens
filter (commercially available), you must first detach
the lens cover.
4 Lens
5 Tally lamp (record indicator)
Lights during recording.
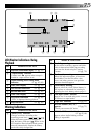
Jacks
6 to 0 are located beneath the covers.
6 Headphones jack
7 AUDIO output jack........................... ੬ pg. 50
8 VIDEO output jack ............................ ੬ pg. 50
9 Ext. Mic input jack ............................ ੬ pg. 65
An optional microphone can be connected for use
with shooting or audio dubbing. When an external
microphone is used, the built-in microphone
automatically shuts off.
0 DC input jack .................................... ੬ pg. 10
! LCD monitor PUSH-OPEN switch......੬ pg. 19
@ VOLUME buttons .............................. ੬ pg. 49
Adjusts the speaker volume.
# Speaker.............................................. ੬ pg. 26
$ OPEN/EJECT switch .......................... ੬ pg. 13