


EN 7
GETTING STARTED
MasterPage: Start_Right
GETTING STARTED
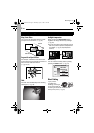
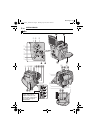
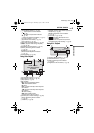
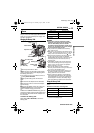
Controls
ASet Button [SET] (੬ pg. 33)
BPlay/Pause Button [4/9] (੬ pg. 20)
Night-Scope Button [NIGHT] (੬ pg. 40)
Up Button
CFast-Forward Button [
5
] (੬ pg. 20)
Flash Button [FLASH] (੬ pg. 39)
DRewind Button [
3
] (੬ pg. 20)
Quick Review Button [QUICK REVIEW]
(੬ pg. 20)
EStop Button [8] (੬ pg. 20)
Backlight Compensation Button
[BACKLIGHT] (੬ pg. 42)
Down Button
FMenu Button [MENU] (੬ pg. 33)
GWhite Balance Button [W.B] (੬ pg. 43)
Information Button [INFO] (੬ pg. 27)
HLCD Backlight Button [LCD BACKLIGHT]
(੬ pg. 16)
Data Battery Button [DATA] (੬ pg. 14)
IFade/Wipe Button [FADE/WIPE] (੬ pg. 44)
Index Button [INDEX] (੬ pg. 27)
JRecording Start/Stop Button (੬ pg. 18)
KVIDEO/MEMORY Switch (੬ pg. 14)
LLock Button (੬ pg. 14)
MPower Switch [A, M, PLAY, OFF] (੬ pg. 14)
NSnapshot Button [SNAPSHOT]
(੬ pg. 25, 39)
OCassette Open/Eject Switch [OPEN/EJECT]
(੬ pg. 16)
PPower Zoom Lever [T/W] (੬ pg. 19)
Speaker/Headphone Volume Control
[VOL. +, –] (੬ pg. 20)
QManual Focus Dial (੬ pg. 41)
RFocus Set Button [SET] (੬ pg. 41)
SManual Focus Button [FOCUS] (੬ pg. 41)
TProgram AE Button [PROGRAM AE]
(੬ pg. 44)
UExposure Button [EXPOSURE] (੬ pg. 41)
VBattery Release Switch [BATT. RELEASE]
(੬ pg. 13)
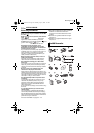
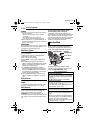
Connectors
The connectors are located beneath the covers.
WUSB (Universal Serial Bus) Connector
(੬ pg. 48)
XDigital Video Connector [DV IN/OUT] (i.Link*)
(੬ pg. 47, 48)
* i.Link refers to the IEEE1394-1995 industry
specification and extensions thereof. The logo
is used for products compliant with the i.Link
standard.
YMicrophone connector [MIC] (੬ pg. 12, 50)
(An optional microphone can be used during
video recording and audio dubbing. To
stabilise the microphone, use of an optional
shoe adapter is recommended.)
ZHeadphone connector [ ] (੬ pg. 12, 50)
(No sound is output from the speaker when
headphones are connected to this connector.)
aS-Video/Audio/Video Input/Output Connector
[S/AV] (੬ pg. 22, 46)
bDC Input Connector [DC] (੬ pg. 13)
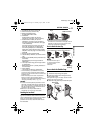
Indicators
cPOWER/CHARGE Lamp (੬ pg. 13, 18)
dTally Lamp (੬ pg. 18)
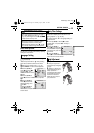
Other Parts
eLCD Monitor (੬ pg. 12)
fCard Cover [MEMORY CARD] (੬ pg. 17)
gShoulder Strap Eyelet (੬ pg. 11)
hGrip Strap (੬ pg. 15)
iCassette Holder Cover (੬ pg. 16)
jSpeaker (੬ pg. 20)
kRemote Sensor (੬ pg. 23)
Camera Sensor
(Be careful not to cover this area, a sensor
necessary for shooting is built-in here.)
lLens
mFlash (੬ pg. 39)
(Be careful not to cover this area in order to
obtain proper flash brightness.)
nFlash Sensor
(Be careful not to cover this area, as it
contains a sensor required by the flash.)
oStereo Microphone (੬ pg. 50)
pShoe
●Attach the optional stereo microphone or
video light. Make sure to turn off the power
of the camcorder and the microphone
before attaching and removing them.
●The attached microphone may be shot in
the image depending on its size.
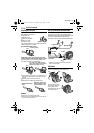
qBattery Pack Mount (੬ pg. 13)
rStud Hole (੬ pg. 16)
sTripod Mounting Socket (੬ pg. 16)
GR-X5PAL.book Page 7 Thursday, April 7, 2005 7:23 PM