


MENUS FOR DETAILED ADJUSTMENT
34 EN
MasterPage: Left
CAMERA
The “m CAMERA” settings are effective when
the power switch is set to both “A” and “M”.
However, the menu settings can be changed
only when the power switch is set to “M”.
[ ] = Factory-preset
[SP]: To record in the SP (Standard Play) mode
LP: Long Play—more economical, providing 1.5
times the recording time.
NOTES:
● Audio dubbing (੬ pg. 50) and insert editing
(੬ pg. 49) are possible on tapes recorded in the
SP mode.
● If the recording mode is switched, the playback
picture will be blurred at the switching point.
● It is recommended that tapes recorded in the LP
mode on this camcorder be played back on this
camcorder.
● During playback of a tape recorded on another
camcorder, blocks of noise may appear or there
may be momentary pauses in the sound.
[12BIT]: Enables video recording of stereo
sound on four separate channels. Select “12BIT”
mode if you want to perform audio dubbing
afterward. (੬ pg. 50) (Equivalent to the 32 kHz
mode of previous models)
16BIT: Enables video recording of stereo sound
on two separate channels. (Equivalent to the
48 kHz mode of previous models)
10X: Only optical zoom is available up to 10X for
video recording and 8X for still image recording.
[40X]*: Digital zoom is available up to 40X.
300X*: Digital zoom is available up to 300X.
* Available only when the VIDEO/MEMORY switch
is set to “VIDEO”.
[FULL]: Snapshot mode with no frame
NEGA: Nega mode
FRAME: Snapshot mode with frame
For details on the procedure, refer to “Snapshot
(For Video Recording)” (੬ pg. 39).
(Available when the VIDEO/MEMORY switch is
set to “VIDEO”)
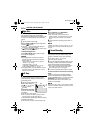
OFF: Allows you to shoot dark scenes with no
picture brightness adjustment.
[AGC]: The overall appearance may be grainy,
but the image is bright.
AUTO : The shutter speed is automatically
adjusted. Shooting a subject in low or poor
lighting at slow shutter speed provides a brighter
image than in the AGC mode, but the subject’s
movements are not smooth or natural. The
overall appearance may be grainy. While the
shutter speed is being automatically adjusted,
“ ” is displayed.
(Available when the VIDEO/MEMORY switch is
set to “MEMORY”)
[AUTO] / ISO 100 / ISO 200 / ISO 400
Select the ISO sensitivity to the desired setting.
MANUAL
The q MANUAL settings are effective only
when the power switch is set to “M”.
[ ] = Factory-preset
(Available when the VIDEO/MEMORY switch is
set to “VIDEO”)
OFF: Disables the function.
[ON ]: To compensate for unstable images
caused by camera-shake, particularly at high
magnification.
NOTES:
● Accurate stabilization may not be possible if hand
shake is excessive, or depending on the shooting
condition.
● The “ ” indicator blinks or goes out if the
Stabilizer cannot be used.
● Switch off this mode when recording with the
camcorder on a tripod.
Recording Menus
REC MODE
SOUND MODE
ZOOM
SNAP SHOT
GAIN UP
GAIN
DIS
[FULL]
FRAME
NEGA
GR-X5US_11Advanced.fm Page 34 Tuesday, April 19, 2005 9:21 AM