


OUTDOOR MONITORING
o
Setting (Once setting is done, start from the “Regular
Operation” below)
Obtaining a Dynamic DNS Account
By obtaining a dynamic DNS account, this unit may be used on the web as
usual even if the IP address changes when making an access to this unit via
internet.
0
Only the JVC dynamic DNS service can be set on this camera.
To obtain (register) an account, perform the following steps.
1
Access the following URL from a browser and register for an account.
(Operation on a computer or smartphone)
https://dd3.jvckenwood.com/user/
Set your e-mail address as the username.
2
Check that you have received a confirmation e-mail to the address used
in registration, and access the URL stated in the e-mail.
(Operation on a computer or smartphone)
3
Set the username and password used in registration on the camera.
(Operation on this camera)
“Setting Dynamic DNS on this Camera (OUTDOOR MONITORING)”
(A p. 158)
4
Execute OUTDOOR MONITORING.
(Operation on this camera)
If “OUTDOOR MONITORING” is executed while dynamic DNS settings
are enabled, the camera will access the dynamic DNS server.
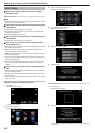
5
Tap “CAMERA NETWORK INFO.” to check that the URL (WAN) is
displayed.
(Registration complete)
“Image Monitoring via the Internet (OUTDOOR MONITORING)”
(A p. 140)
Caution :
0
Registration will be canceled if you do not access the dynamic DNS server
from the camera within 3 days.
Perform the registration again in this case.
0
Registration will not be complete if the username and password set on this
camera are incorrect. Be sure to check that they are correct.
0
Successful registration will be canceled too if you do not access the
dynamic DNS server for 1 year.
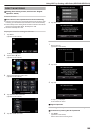
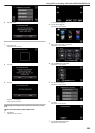
Create a QR code.
o
Enter values in the required items for outdoor monitoring.
0
Password: set a password to connect this camera to the device via access
point. (Not more than 8 characters)
0
DDNS: Set the connection environment to the internet. Normally set to
“ON”.
0
User name (DDNS): set an user name for the obtained DDNS account.
0
Password (DDNS): set a password for the obtained DDNS account.
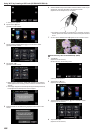
0
UPnP: Set to “ON” if the UPnP protocol may be used to connect the device
to the network.
0
HTTP Port: Set the port number for connecting to the internet. Normally
set to “80”.
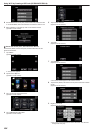
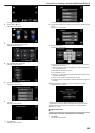
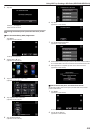
Display the screen for reading the QR code.
1
Tap “MENU”.
(Operation on this camera)
.
0
The top menu appears.
2
Tap the “Wi-Fi” (Q) icon.
(Operation on this camera)
.
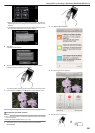
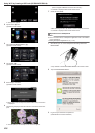
3
Tap
1
on the lower right of the screen.
(Operation on this camera)
.
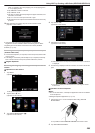
4
Tap “COMMON Wi-Fi SETTING”.
(Operation on this camera)
.
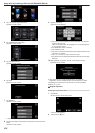
5
Tap “SET FROM QR CODE”.
.
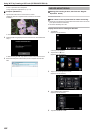
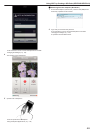
6
Tap “EXECUTE”.
.
Read a QR code.
1
Read a QR code.
(Operation on this camera)
.
Using Wi-Fi by Creating a QR Code (GZ-EX355/GZ-EX310)
207