


K
Allows people to be captured naturally with minimal
noise in the overall image.
L
Records while focusing on a near object even in a
dark environment.
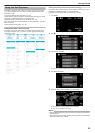
Memo :
0
Scenes can be detected according to the shooting conditions and
automatically adjusted in Intelligent Auto mode.
0
Some functions may not work properly depending on the shooting
conditions.
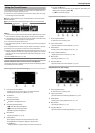
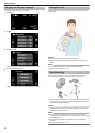
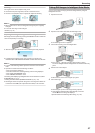
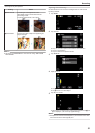
Operation Buttons for Video Recording
.
Operation Button Description
T/W Zoom Allows the same functions as the zoom lever to be
performed.
Camera shake that often occurs when using the
zoom lever can be minimized.
“Zooming” (A p. 27)
Playback Mode
L
Switches to the playback mode.
Recording Start
g
Record-Standby
a
Functions as the START/STOP button.
MENU Displays the various menus of video recording.
“Operating the Menu” (A p. 75)
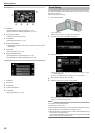
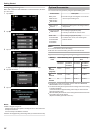
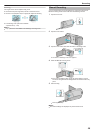
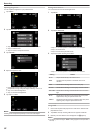
Display Button n
Some displays disappear after approximately 3
seconds.
Use the n button to change the displays as shown
below.
0
Tap n button
Displays appear for approximately 3 seconds
with every tap.
0
Tap and hold n button
Displays are fixed such that they do not
disappear. After setting, the display button
changes from n to m.
Tap m to release the displays.
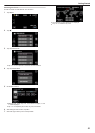
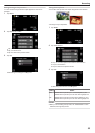
Useful Settings for Recording
0
When “QUICK RESTART” is set to “ON”, this unit turns on immediately if
you open the LCD monitor within 5 minutes after the power is turned off
by closing the monitor.
“QUICK RESTART” (A p. 98)
0
When “AUTO POWER OFF” is set to “ON”, this unit turns itself off
automatically to conserve power when it is not operated for 5 minutes.
(only when using the battery pack)
“AUTO POWER OFF” (A p. 97)
0
When “TOUCH PRIORITY AE/AF” is set to “FACE TRACKING”, this unit
detects faces and automatically adjusts its brightness and focus to record
the faces more clearly.
“Capturing Subjects Clearly (TOUCH PRIORITY AE/AF)” (A p. 39)
0
If the remaining space on the built-in memory runs out while “SEAMLESS
RECORDING” is set to “ON”, recording continues after switching to the
SD card.
“SEAMLESS RECORDING” (A p. 82)
Caution :
0
Do not expose the lens to direct sunlight.
0
Do not use this unit in the rain, snow, or places with high humidity like the
bathroom.
0
Do not use this unit in places subject to excessive humidity or dust, as well
as places exposed to steam or smoke directly.
0
Do not remove the battery pack, AC adapter, or SD card when the access
lamp is lighted. The recorded data may become unreadable.
“ACCESS (Access) Lamp” (A p. 105)
0
This unit is a microcomputer-controlled device. Electrostatic discharge,
external noise and interference (from a TV, a radio, etc.) might prevent it
from functioning properly. In such a case, turn off the power, then remove
the AC adapter and battery pack. This unit will be reset.
0
Make a backup of important recorded data.
It is recommended to copy your important recorded data to a DVD or other
recording media for storage.
JVC will not be responsible for any lost data.
Memo :
0
Check the remaining recording time in the media before you start shooting.
If there is not enough space, move (copy) the data to a computer or disc.
0
When there are many files in the media, it may take time for them to be
displayed on the playback screen. Wait for a while as the access lamp
appears blinking, which indicates normal operation.
0
Do not forget to make copies after recording!
0
Recording stops automatically as it cannot be performed for 12 or more
consecutive hours according to specifications.
(It may take some time to resume recording.)
0
For long recordings, the file is split into two or more files if the size exceeds
4 GB.
0
You can connect this unit to the AC adapter to record for long hours
indoors.
Recording
26