


Charging the Battery Pack
.
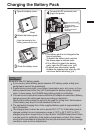
Charging finished:
Goes out
Charging in progress:
Blinks
Charging Lamp
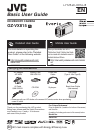
Close the battery cover.
Connect the DC connector and
plug in the power.
Open the battery cover.
To detach the battery pack, perform
the above steps in reverse order.
Attach the battery pack.
(Base)
Align the terminal of the
battery pack with this unit.
The battery pack is not charged at the
time of purchase.
If it is difficult to detach the battery
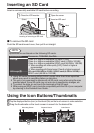
pack, open the SD card cover. (p.6)
To attach any other battery packs
besides the supplied one, open the SD
card cover before attaching. (p.6 )
CAUTION
Be sure to use JVC battery packs.
0
If you use any other battery packs besides JVC battery packs, safety and
performance cannot be guaranteed.
0
If malfunctions (overcurrent, overvoltage, transmission error, etc) occur, or if any
battery manufactured other than JVC is attempted for battery charge, charging
stops. In these cases, the CHARGE lamp blinks quickly for notification.
0
You can record or play back videos while the AC adapter is connected. (Battery
charging cannot be performed during recording or playback.)
Remove the battery when the unit is to be used for a long time. Performance
of the battery may drop if it is left attached to the unit.
0
The estimated charging time of the supplied battery pack is approximately 3
hour 30 minutes.
0
The charging time is when the unit is used at 25°C (77°F). If the battery pack is
charged outside the room temperature range of 10°C to 35°C (50°F to 95°F),
charging may take a longer time or it may not start. CHARGE lamp blinks 2 times
in a slow cycle for notification if the battery charge does not start. Also, please
note that the recordable and playable time may be shortened under some usage
conditions, such as at low temperature.
5