


1-10
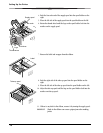
Setting Up the Printer
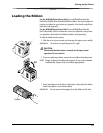
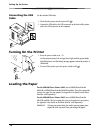
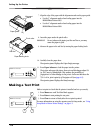
7. Align the edge of the paper with the alignment marks on the paper guide.
• Use the 5" alignment marks when loading paper into the
KODAK Photo Printer 6805.
• Use the 6" alignment marks when loading paper into the
KODAK Photo Printer 6800.
8. Insert the paper under the pinch roller.
IMPORTANT: Do not advance the paper past the red line or you may
cause the paper to jam.
9. Advance the paper to the red line by turning the paper feeding knob.
10. Carefully close the paper door.
The operator panel displays the Paper Empty message.
11. Press Paper Advance to load the paper into the printer.
The printer advances the paper, then cuts and discharges about 24
in. (607 mm) of blank paper. This reduces the possibility of
fingerprints or other damage to the prints. It does not decrease the
750 4 x 6 in. print capacity of the paper roll (see page A-2).
The operator panel displays the Ready message.
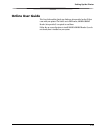
Making a Test Print
Make a test print to check that the printer is installed and set up correctly.
1. Press Menu once until Test Print Mode appears.
2. Press Enter to start printing the test print.
3. Press Clear to return to Ready after the test print is printed.
For more information on using the operator panel in Setup mode, see “Using
Setup Mode to Review Printer Settings” on page 4-2.
Alignment
marks
Paper guide
Pinch roller
Red line
Paper feeding knob
Menu Advance
Paper
Enter
Paper
Rewind/Clear
Error
Ready
Power
Photo Printer 6800
Kodak
Menu Advance
Paper
Enter
Paper
Rewind/Clear
Error
Ready
Power
Photo Printer 6800
Kodak
1
2
3