


If, for instance, the light is too poor for automatic exposure,
the release button is automatically locked, i. e. it cannot be
pressed down to release and a STOP signal appears in the
finder. You will have to use flash is you still want to take
the picture.
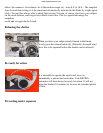
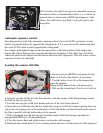
Automatic exposure control
For taking pictures with fully automatic exposure control, the word AUTO (automatic) on the
shutter ring should always be opposite the setting mark. If it is not just turn the shutter ring until
the word AUTO clicks in place opposite the setting mark.
For strongly back-lighted subjects aim the camera first at the dark portion of the subject and
depress the release button just far enough until the first resistance is felt. Only then should the
camera be aimed at the subject and the release button be fully depressed. This will assure correct
exposure of shots into the light.
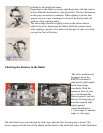
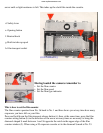
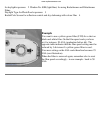
Loading the camera with film
l. Always load your RETINA automatic I in the
shade or at least in the shadow of your body.
2. Turn the safety lever (d) on the camera base,
press the opening
button and the camera back will spring open.
3. Pull out the rewind knob (f) as far as it will go.
4. Drop the cassette of film into the film chamber, with the tongue of the film pointing towards
the built-in take-up spool (g).
5. Turn the take-up spool with your thumb until one of the slots faces upwards.
6. Insert the end of the film into the slot in the take-up spool so that the tooth projecting from one
side of the slot engages one of the perforations of the film. Make sure that the perforated edge of
the film is parallel with the bottom edge of the camera.
7. With your thumb turn the take-up spool until the teeth of the film transport sprocket are
engaged in BOTH rows of film perforations.
8. Close the camera back and make certain you hear the catch engage.
9. Push back the rewind knob (f) to its normal position and turn it in the direction of the engraved