


52
SATA Hard Drive Replacement - Appendix #6
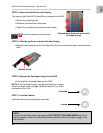
STEP 4: Secure the Hard Drive in the Casing
This step is vital for the SATA Hard Drive to connect to the DVR.
• Use the 4 provided screws
• Positioning the Hard Drive into place
• Tighten the 4 screws on the bottom of the Casing
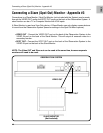
STEP 5: Slide the top Cover over the Cartridge Casing
• Slide the Cover forward over the Cartridge Case. Ensure it is secured in place over the release
latch.
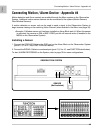
STEP 6: Reinsert the Cartridge Casing into the DVR
• Fully insert the Cartridge Case into the DVR.
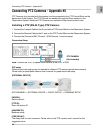
STEP 7: Lock the Cabinet
Lock the cabinet by turning the key clockwise.
Locked
Unlocked
NOTE:
If you do not lock the cabinet, the system will NOT DETECT THE HARD DRIVE and will not
function properly. Refer to the Side Panel (Removable Hard Drive Cartridge) on page 12 for
lock location.
NOTE: If the Cartridge Casing is not going all the way in, gantly
adjust the angle of the cartridge Casing to help line it up to the
connectors in the DVR.
Position Hard Drive and secure with
provided screws
NOTE: Insure to use the correct screws.
Release Latch