


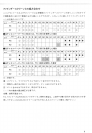
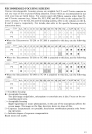

DEPTH OF FIELD
Depth of field can be checked with the color-coded depth-of-field indicators engraved
on the lens barrel.
If your camera has a depth-of-field preview function, it is possible to check the depth
of field in the viewfinder. (For details, see camera instruction manual.)
Depth of field can also be checked by referring to the table on page 42.
INFRARED PHOTOGRAPHY
In infrared photography, it is necessary to make the following adjustments to the
focused distance.
1.
Focus subject.
2.
Reset the focusing ring to align the focused distance with the infrared focusing
index.
4.
Attach the appropriate filter, such as R60, etc., and take the shot.
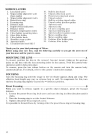
USING FILTERS
Always use a filter with the lens. The slip-in glass filter holder comes mounted with a
Nikon L37C filter. A slip-in gelatine filter holder is also supplied with the lens.
Replacing Glass Filters C]
#
C
2
-C
3
1.
Press down on the glass filter holder knob, and turn counterclockwise until the
white line on the knob is at a right angle to the axis of the lens.
2.
Pull the holder out.
3.
Unscrew the mounted filter and replace with the filter you want to use.
4.
Put the holder back, push down on the knob, and turn clockwise to lock.
Using Gelatine Filter D
1.
Cut the gelatine filter into a circle of approx. 55mm (2.2 in.) in diameter.
2.
Open the gelatine filter holder plate by pushing on the latch and lifting up.
3.
Insert the gelatine filter into the holder and close the plate. Make sure the filter is
unscratched and free from dust and take care that it stays flat.
4.
Remove the glass filter holder from the lens and insert the gelatine filter holder.
USING LENS HOODS
When shooting in bright sunlight, use the lens hoods to prevent stray light from enter-
ing your lens.
To Use Built-in Lens Hood Ej *E
2
1.
Turn the hood clockwise and pull out as far as it goes.
2.
Secure in place by continuing to turn counterclockwise until it locks.
To Attach Extention Lens Hood HE-3 F
1.
Loosen the lock screw on the HE-3.
2.
Slip the HE-3 onto the front of the built-in hood.
3.
Tighten the locking screw.
14