


4140
Technical Operation
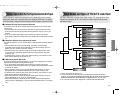
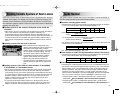
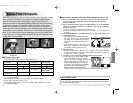
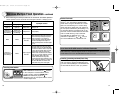
Bounce-Flash Photography
When taking pictures of a person in front of a wall, a direct flash often causes
harsh, unattractive shadows on the subject or background (photo below,
right). By bouncing the light off the ceiling or walls, you can soften the
shadows and produce more natural-looking portraits (left and center photos).
In addition to the general single-flash bounce operation (center photo),
the SB-50DX enables you to perform double-flash bounce operation
when used with a camera having a built-in Speedlight (photo below, left).
Double-flash bounce operation will provide a more natural-looking lighting
effect. If your camera has a built-in Speedlight, perform this double-flash
bounce operation. In bounce-flash photography, high ISO sensitivity such
as ISO 400 is recommended.
Bounce-flash (off the ceiling) with
double flash
Bounce-flash with
single flash
Direct flash (built-in
Speedlight)
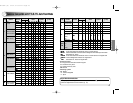
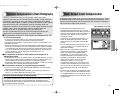
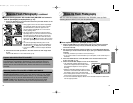
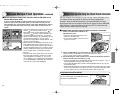
•Tilting the flash head
•The flash head can be tilted up to 90° or down to –18°.
Horizontal
Tilting angle Up to 90°
position (0°)
Down to –18°*
1
Click-stop positions*
2
90°, 75° and 50° 0° –18°
LCD panel indication
Zoom-head position Fixed at 50mm*
3
24 to 50mm
14mm (with wide-
flash adapter*
3, 4
)
Guide number
(ISO 100, m/ft.)
26/85 (fixed) 18/59 to 26/85 12/39 (fixed*
4
)
*1 Generally, the flash head is tilted down for close-up flash shooting (p. 43). Attach
the wide-flash adapter.
*2 Flash head can be tilted up or down to the intermediate positions.
*3 Power Zoom does not function (p. 16).
*4 Zoom head position is fixed at 24mm and guide number 18/59 (m/ft.) without
the wide-flash adapter.
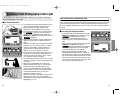
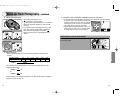
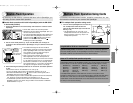
•Bounce-flash operation with single flash (example photos, p. 10)
1. Attach the SB-50DX to the camera body and set the camera’s exposure
mode to Aperture-Priority Auto (A) or Manual (M). (See your camera’s
instruction manual).
2. Set the camera’s metering system to Matrix Metering or Center-Weighted
Metering and flash sync mode to Front-Curtain Sync. (See your camera’s
instruction manual.)
• Generally, set flash sync mode to Front-Curtain Sync.
• If your camera does not have the flash sync mode option, Front-Curtain Sync is
activated.
3. Press the MODE button of the SB-50DX to set TTL/D-TTL auto flash (p. 18).
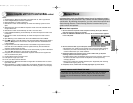
4. Tilt the flash head.
• For easiest bounce-flash operation, tilt the
flash head up at least 50° to bounce light off
the ceiling. Make sure that the light from the
flash head does not directly illuminate the
subject.
• Good results are generally obtained when the
flash head is positioned 1 to 2m away from
the reflecting surface (ceiling, wall, etc.).
5. Set the aperture.
• With bounce flash, there is light loss when compared to normal flash operation,
so use an aperture two to three stops wider (smaller f-number) than you would
for regular TTL auto flash operation.
6. Compose, focus, confirm the ready-light comes on, then shoot.
• If the ready-light on the SB-50DX and the
camera’s viewfinder ready-light fi blink for
approx. 3 sec. after shooting (p. 21), the flash
has fired at its maximum output. This may
indicate underexposure has occurred. To
compensate, use a wider aperture (smaller f-
number) or reduce the bounce distance
(distance between the flash head and
reflecting surface and/or distance between the subject and reflecting surface).
Note on reflecting surface
In color photography, select white or highly reflective surfaces to bounce light
off of. Otherwise, your picture will come out with an unnatural color cast similar
to that of the reflecting surface.
SB-50DX (E) 02.12.9 2:33 PM Page 40