Using the Nokia Image Frame
18
■
Modifying the display brightness
When the power is switched on, you can modify the brightness of the
display by pressing briefly . There are five brightness levels, and each
time you press , the level is raised by one. When the highest
brightness level is used and you press , the Nokia Image Frame
returns to the lowest brightness level.
■
Sending an image from the Nokia Image Frame
When the power is switched on, select the image you want to send on
the display of the Nokia Image Frame.
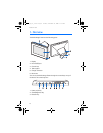
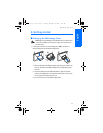
1. If needed, activate the IR port of the device to which you want to
send an image.
2. Direct the IR ports of the Nokia Image Frame and the receiving
compatible device toward each other, and ensure that there are no
obstructions between the devices. The maximum allowed distance is
up to 1.5 m and the transmission angle 15
o
.
3. Press and to send the image. The icon blinks while the
Nokia Image Frame attempts to establish a connection to the
receiving device. During the image transfer the icon stops
blinking. When the image is successfully sent, the Nokia Image
Frame displays the icon.
■
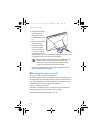
Receiving images with the Nokia Image Frame
When the power is switched on, the Nokia Image Frame can receive
images. Note that the Nokia Image Frame converts the received images
to display them. For more information, see ”Image format” on page 7.
The image receiving procedure differs depending on the sending device.
If the sending device can send images over IR, you can send the selected
images from the device while the Nokia Image Frame is in the passive IR
reception mode. If image sending cannot be activated from the sending
device, the Nokia Image Frame can pull all the images from the sending
device’s default image folder using the active IR reception mode.
% !"