


Using the Nokia Image Frame
19
English
Receiving images over IR:
1. If you want the images in the Nokia Image Frame to be in a certain
order, press briefly or to scroll to the image after which you
want to store the new images.
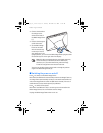
2. Direct the IR ports of the Nokia Image Frame and the compatible
sending device toward each other, and ensure that there are no
obstructions between the devices. The maximum allowed distance is
up to 1.5 m and the transmission angle 15
o
.
3. When the sending device starts to send the images, the Nokia Image
Frame enters the passive IR reception mode and displays the
icon. For more information on how to initiate sending from the other
device, refer to the user’s guide of that device.
4. During the image transfer, the Nokia Image Frame displays the
icon and the received images one by one.
5. After the images have been received, the Nokia Image Frame returns
to the previous mode, and the images are stored as the next images
after the currently displayed image.
If you want to edit the new images, see ”Editing the images” on page
16.
Pulling images over IR:
The Nokia Image Frame pulls all the images from the image source
device’s default directory. The maximum number of images in the Nokia
Image Frame is 50. If this limit is reached during the image transfer, the
transfer is disconnected so that only 50 images in total are stored to the
Nokia Image Frame.
1. If you want the images in the Nokia Image Frame to be in a certain
order, press briefly or to scroll to the image after which you
want to store the new images.
2. Direct the IR ports of the Nokia Image Frame and the compatible
image source device toward each other, and ensure that there are no
obstructions between the devices. The maximum allowed distance is
up to 1.5 m and the transmission angle 15
o
.
& !"