


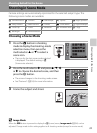

29
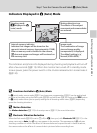
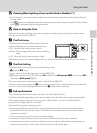
Using the Flash
Basic Photography and Playback: Auto Mode
B Shooting When Lighting is Poor and the Flash is Disabled (W)
• Use of a tripod is recommended to stabilize the camera during shooting and avoid the effects of
camera shake.
• The E indicator is displayed when the camera automatically increases sensitivity. Pictures taken
when E is displayed may be slightly mottled.
B Note on Using the Flash
Reflections from dust particles in the air may appear as bright spots in pictures. To reduce these
reflections, set the flash to W (off).
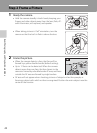
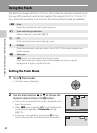
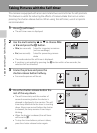
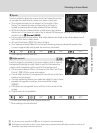
C The Flash Lamp
The flash lamp indicates the flash status when the
shutter-release button is pressed halfway down.
• On: Flash will fire when picture is taken.
• Blinks: Flash charging. Wait a few seconds and try
again.
• Off: Flash will not fire when picture is taken.
If the battery is low, the monitor display will turn off, and remain off, until the flash is fully charged.
C The Flash Setting
The default flash mode setting varies with shooting mode.
• A (auto): U (auto)
• Scene: varies with the selected scene mode (A34-40)
• F (smart portrait): fixed at W (off) when On is selected for Blink proof, U (auto) when Off is
selected for Blink proof (A49)
Flash cannot be used simultaneously with certain features (A105).
The flash mode setting applied in A (auto) mode is stored in the camera’s memory even after the
camera is turned off, and reapplied the next time A (auto) mode is selected.
C Red-eye Reduction
This camera uses advanced red-eye reduction (“In-Camera Red-Eye Fix”).
Pre-flashes are fired repeatedly at low intensity before the main flash, reducing the red-eye effect.
If the camera detects “red-eye” when a picture is taken, Nikon’s own In-Camera Red-Eye Fix
processes the image before it is recorded.
Note the following when taking pictures:
• Because pre-flashes are fired, there is a slight lag between when the shutter-release button is
pressed and when the picture is shot. This mode is not recommended when a quick shutter
response is required.
• The time required to save the picture increases slightly.
• Advanced red-eye reduction may not produce the desired results in some situations.
• In extremely rare instances, areas not subject to red-eye may be affected by advanced red-eye
reduction processing; in these cases, choose another mode and try again.