


14
Date or Time
You can use settings in the setup/connection
mode to set the date, time and date format.
When you take a picture, the current date and
time are recorded with the image. This
recorded date or time can be stamped on
printed image if you use select date or time
stamping for printing. Processing and handling
images with CAMEDIA Master 2.5 ensures that
this date and time information is preserved,
even after the images are transferred to a
computer. Otherwise, this date and time
information may be lost with other graphics
software applications.
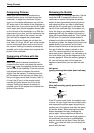
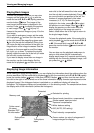
After you set up date or time stamping, the
setting applies to all images selected for
printing. Insert the memory card that contains
the pictures that you want to select for date or
time stamp printing. Check the control panel
display and make sure that the mark for the
source card, SmartMedia or CompactFlash
is displayed. If the correct mark is not
displayed, press and hold the SM/CF memory
card button, and then turn the main dial or sub
dial until it is displayed. Set the mode dial to the
print reserve mark . Press the menu button
to open the menu in the monitor. Press
or to move the green highlight to the date/
stamp mark . Press to move the green
highlight to the right, and then press again to
move the green highlight to DATE or TIME, or if
you want to cancel the date or time setting
move the green highlight to OFF. Press the
button to select the setting. Press the button
again to close the menu.