


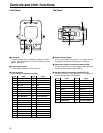
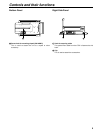

Mounting the camera
1 Mount the camera on the camera mounting base, and
slide the camera toward the front along the groove until it
clicks into place.
Detaching the camera from the camera mounting base
While pushing the red lever, move the black lever in
the direction of the arrow, and slide the camera
toward the back.
<Note>
If the pin of the camera mounting base fails to return
to its original position after the camera has been
detached, push the red lever again and
simultaneously move the black lever in the direction of
the arrow to return the pin to its original position.
Bear in mind that the camera cannot be mounted if
the pin still remains at the center.
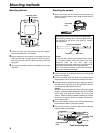
2 Lift the camera's lens clamp lever as far as it will go and
keep it at this position.
3 Pull the front/back slide lock lever of the camera mount
base toward the front, and move the camera to the front.
4 Insert the camera's bayonet mount by aligning its position
with the mount ring of the lens, and rotate the camera's
lens clamp lever downward to secure it.
<Note>
When the lens and camera positions cannot be aligned
properly, rotate the height adjustment knob of the camera
mount base and align the heights of the lens and
camera. When the knob is rotated clockwise, the camera
moves up; conversely, when it is rotated counterclock-
wise, it moves down.
5 Push the front/back slide lock lever of the camera mount
base toward the back to secure the camera.
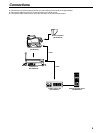
6 Connect the camera connection optical fiber cable and
interface cable to the camera.
Mounting the lens
1 Loosen the lens lock knob and turn the lens clamper
counterclockwise until it is horizontal.
2 Align the guide pin at the center in the upper part of the
lens back with the U-shaped groove in the front panel,
and mount the lens onto the camera by fitting it onto the
lens guide.
3 Turn the lens clamper clockwise, and tighten up the lens
lock knob.
8
Mounting methods
Lens lock knob
Lens clamper
Height adjustment
knob
Front/back slide
lock lever
Back: LockFront: Release
Camera mounting base
U-shaped groove
Lens guide
P
H
A
N
T
O
F
F
A
B
P
H
A
N
T
O
F
F
A
B
(
d
B
)
—
2
0
—
3
0
—
4
0
M
I
C
1
—
5
0
—
6
0
(
d
B
)
—
2
0
—
3
0
—
4
0
—
5
0
—
6
0
M
I
C
2
R
NAM
Y /C
FILTER LOCAL MONI SEL
G
B
1
A
CAM
/
VTR
GAIN
ON
STBYSAVE HIGH
LOW
MID BAR A
CAM B
TEST PRST
ON
PTT
OUTPUT
W.BAL
USER SEL
SD CARD
Lens#Release Lens#Lock
Red lever
Camera mounting base
Black lever
Down Up
Lens clamp
lever