Connecting to a PC or Printer
118
VQT0R81
Connecting to a PC
You can load pictures recorded with the
camera to a PC by connecting the camera
and PC.
The software [LUMIX Simple Viewer] or
[PHOTOfunSTUDIO-viewer-]
(for Windows
R
) in the CD-ROM (supplied)
allows you to load pictures recorded with
the camera to a PC, print, or send them by
e-mail easily.
If you use Windows
98/98SE, install the
USB driver and then connect it to the
computer.
Refer to the operating instructions for PC
connection for detailed information about
the software included in the CD-ROM
(supplied) and installation.
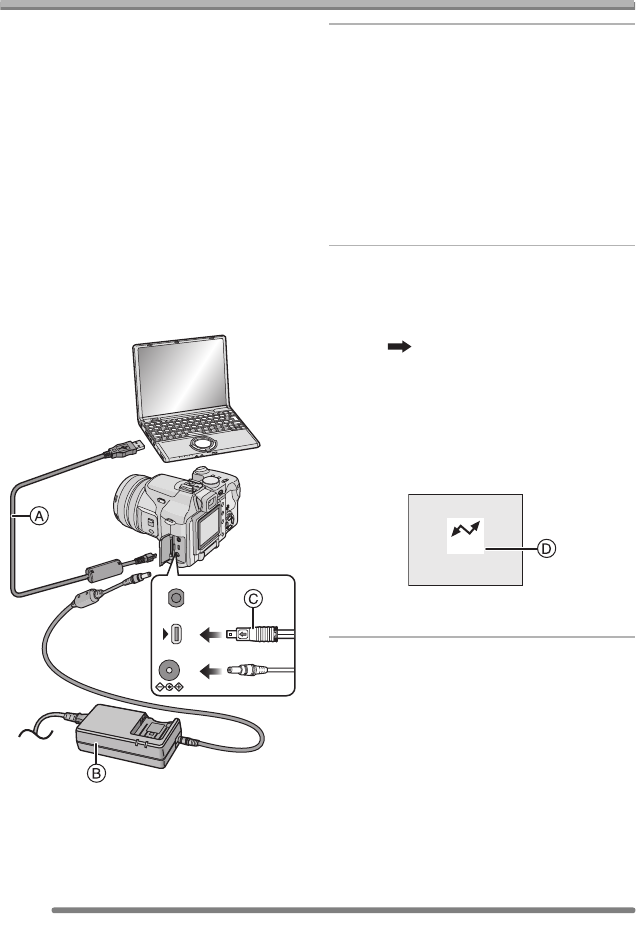
A: USB connection cable (supplied)
B: AC adaptor (DMW-CAC1; optional)
• Turn off the camera before inserting or
removing the cable for the AC adaptor
(DMW-CAC1; optional).
1 Turn the camera on and then set
[USB MODE] on the [SETUP]
menu to [PC]. (P117)
• If you set [USB MODE] to [PictBridge
(PTP)] and then connect the camera to
the PC, messages may appear on the
screen of the PC.
Select [Cancel] to close the indications
and disconnect the camera from the
PC. Connect the camera after you set
[USB MODE] again.
2 Connect the camera to a PC via
the USB connection cable A
(supplied).
• Connect the USB connection cable with
the [ ] mark facing the [1] mark on
the [DIGITAL] socket.
• Hold the USB connection cable at C
and insert straight in and take straight
out. (Forcibly inserting at a slant or
upside down can deform the pins, and
this can damage the camera or other
connected equipment.)
D: This message appears during data
transfer.
[Windows]
The drive appears on the [My Computer]
folder.
• If it is the first time you are connecting the
camera to a PC, the required driver is
installed automatically so that the camera
can be recognized by the Windows Plug
and Play, then it appears on the
[My Computer] folder.
[Macintosh]
The drive is displayed on the screen as
[NO_NAME] or [Untitled].
REMOTE
DC IN 8.4V
AV OUT/
DIGITAL
ACCESS


