


87
VQT3K69
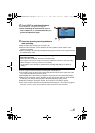
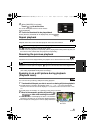
4 Touch [EXIT] to end the adjustment.
≥ After adjustment, a single screen appears.
≥ When re-attaching the 3D Conversion Lens or
after an impact etc., it is recommended that you
perform the adjustment again.
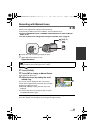
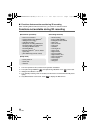
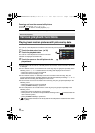
5 Press the recording start/stop button to
start recording.
≥ Start recording after removing the Lens front cap.
≥ When the 3D Conversion Lens is attached, the zoom position is fixed, and the zoom
operation is disabled.
≥ When recording in 3D, the image will appear with gray frame around it. The gray frame will
be recorded in the video.
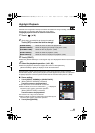
≥ Use of a tripod is recommended for recording with a stable picture.
≥ The reception range for the remote control might become narrow at the upper side of the
unit, so operate from the lower side. (l 54)
≥ [ECONOMY] will not work while you adjust the 3D Conversion Lens attachment position.
≥ When the 3D Conversion Lens is attached, the auto slow shutter setting is [AUTO SLOW
SHTR (3D)]. The default setting of [AUTO SLOW SHTR (3D)] is [ON]. (l 73)
≥ While 3D recording if moving the unit fast, the message is more likely to appear.
≥ If the unit is turned on with the lens cap attached in the shade etc., the screen may appear
to be blue. In such a case, remove the lens cap to return the screen to normal.
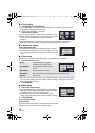
To ensure that the 3D video can be safely viewed, pay attention to the following
points when recording.
≥ Where possible, record with the unit in a horizontal state.
≥ Do not get too close to the subject. (record from a distance of at least 1.2 m (3.9 feet).)
≥ When moving the unit as you record, move it slowly.
≥ Try to hold the unit as steady as possible when recording while riding in a vehicle or
walking.
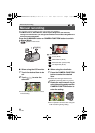
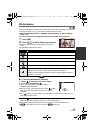
3D
0h00m00s
0h00m00s
0h00m00s
R 1h20m
R 1h20m
R 1h20m
HG
A appears.
3D
HDCTM900&HS900P&PC-VQT3K69_mst.book 87 ページ 2010年12月16日 木曜日 午後7時8分