QR
Adding scenes
Follow steps 1–2 of “Adding/Deleting Scenes from
Play List (Edit)”.
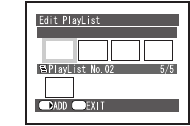
P Press the ∫ side of the Multi-function
Button down to move the cursor to the
lower row, and press the 6/5 side of
the Multi-function Button to select the
point where the scene is to be inserted.
≥1: Insertion position
Q Press the ; side of the Multi-function
Button up to move the cursor to the upper
row, and press the 6/5 side of the
Multi-function Button to point the cursor
to the scene to be added, and press the
[1 SET] Button.
≥2: Scene to be added
R Repeat step 4 in order to add the desired
scene and then press the [MENU] Button.
S The confirmation screen appears and
then select [YES] and press the [1 SET]
Button.
Deleting scenes
Follow steps 1–2 of “Adding/Deleting Scenes from
Play List (Edit)”.
3 Press the ∫ side of the Multi-function
Button down to move the cursor to the
lower row, and press the 6/5 side of
the Multi-function Button to select the
place the cursor on the scene to be
deleted, and press the [1 SET] Button.
≥A: Scene to be deleted
4 Repeat step 3 in order to delete the
desired scene and then press the [MENU]
Button.
5 The confirmation screen appears and
then select [YES] and press the [1 SET]
Button.
SET/
Menu


