


Before Use
-16-
Power Supply
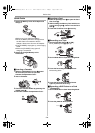
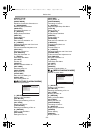
ª Using the AC Adaptor
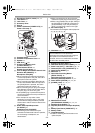
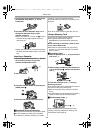
1 Connect the DC Cable to the Palmcorder.
2 Connect the DC Cable to the AC Adaptor.
3 Connect the AC Cable to the AC Adaptor
and the AC Jack.
≥The AC Cable’s outlet plug does not fit
entirely into the AC Adaptor jack. A gap will
remain as shown 1.
≥Before connecting or disconnecting the
power supply, set the [OFF/ON] Switch on
the Palmcorder to [OFF] and make sure that
[POWER] Lamp is not lit.
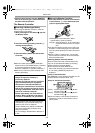
ª Using the Battery
Before use, fully charge the Battery.
≥We recommend using a Panasonic Battery.
≥We cannot guarantee the quality of this
Palmcorder when batteries from other
companies are used.
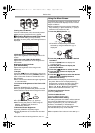
1 Attach the Battery to the AC Adaptor and
charge it.
≥Since the Battery will not be charged when
the DC Cable is connected to the AC
Adaptor, disconnect it from the AC Adaptor.
≥The [CHARGE] Lamp lights up, and charging
starts.
≥When the [CHARGE] Lamp goes off,
charging is completed.
≥When the battery is completely discharged,
the [CHARGE] lamp blinks at first, but the
battery is charged normally. When the
temperature of the battery is too high or low,
the [CHARGE] lamp blinks and the charging
time becomes longer than usual.
1
2 Attach the charged Battery to the
Palmcorder.
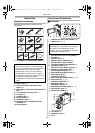
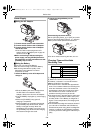
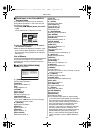
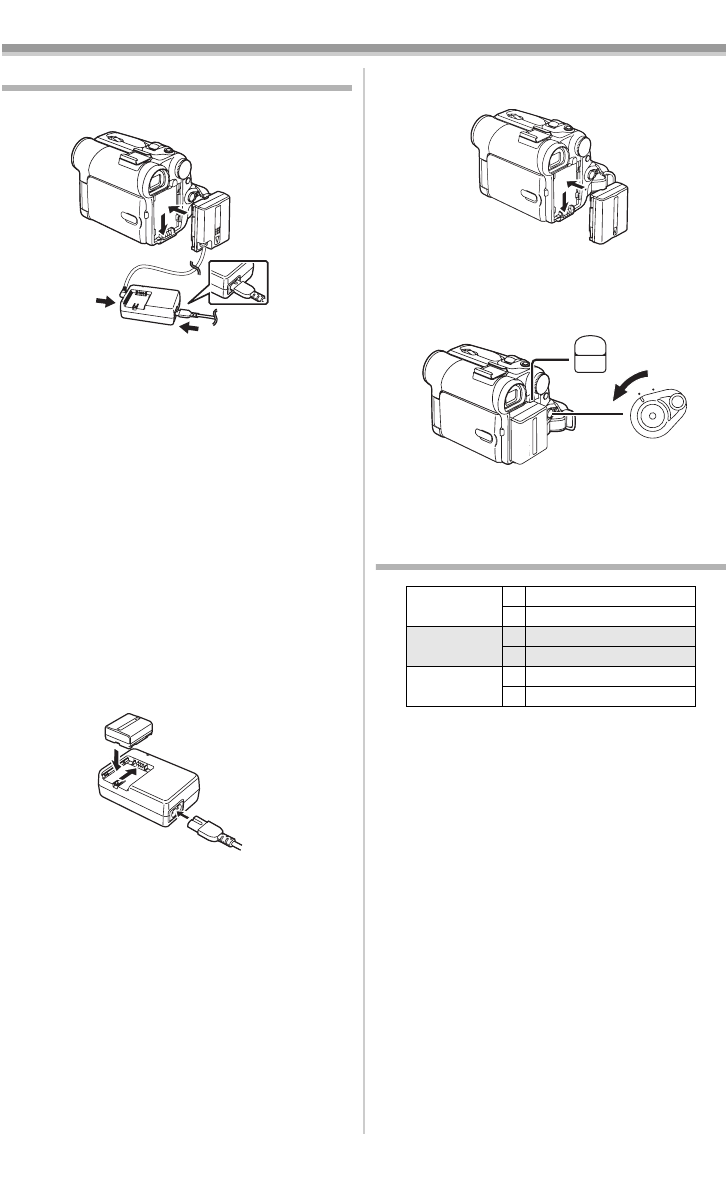
Disconnecting the Power Source
Set the [OFF/ON] Switch
(46) to [OFF] and, while
pressing the [PUSH BATT] Button
(51), slide the
Battery or DC Cable upward to disconnect it.
≥For other notes concerning this item, see
-63-.
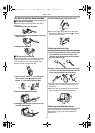
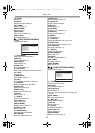
Charging Time and Available
Recording Time
A Charging Time
B Maximum Continuous Recording Time
≥“1h30min.” indicates 1 hour and 30 minutes.
≥Battery CGA-DU07 is supplied.
≥The times shown in the table are approximate
times. The numbers indicate the recording time
when the Viewfinder is used. The numbers in
parentheses indicate the recording time when
the LCD Monitor is used. In actual use, the
available recording time may be shorter.
≥The times shown in the table are for continuous
recording at a temperature of 68oF (25oC) and
humidity of 60%. If the Battery is charged at a
higher or lower temperature, the charging time
may be longer.
≥The available recording time becomes shorter if
you use both of Viewfinder and LCD Monitor
simultaneously when using the 0 Lux MagicPix
function or rotating the LCD Monitor frontward
to record yourself or setting [EVF ON/AUTO] to
[ON].
CGA-DU07 A 1h30min.
B 2h15min. (1h50min.)
CGA-DU14 A 2h45min.
B 4h30min. (3h40min.)
CGA-DU21 A 3h55min.
B 6h45min. (5h30min.)
PUSH
BATT
ON
OFF
(51)
(46)
PV-GS55PP_Eng.book 16 ページ 2004年2月10日 火曜日 午前11時51分