


- 3 -
4) Select “Yes”to connect to the computer. Press the MENU (4) button to
confirm.
5) Once the unit is connected to the computer, DPFMate, the image file
transfer utility, will run automatically. If DPFMate does not appear, do the
following: In the Windows start menu, go to “My Computer,”and find the drive
letter of the PhotoFrame. Double click on the PhotoFrame drive (or right-click
and choose “Explore”) to reveal the PhotoFrame’s files. Find the DPFMate
application. Double click on DPFMate to run the application.
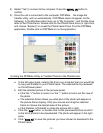
6) Using the DPFMate Utility to Transfer Photos to the PhotoFrame.
a. In the left upper pane, select a file from your computer that you would like
to copy and transfer to your PhotoFrame. The selected file is previewed
on the left lower panel.
b. Edit the selected picture in the preview panel.
Click the “+”button to zoom in or the “-“button to zoom out the view of
the photo.
The selection frame shows you what part of the photo will appear on
the picture frame display. Click your mouse and drag the selection
frame to choose the desired area of the picture.
Click RotateL or RotateR to rotate the picture left or right.
c. Click the “Add”button, or double-click on the previewed picture to add it
to the list of photos to be downloaded. The photo will appear in the right
pane.
d. Click “Save All”to save the pictures you have chosen to download to the
PhotoFrame.