


26/31
FV-L500B1
User’s Guide Rev. 1.01
4.4.2 Descriptions of the Camera Control Commands
(The underline settings are the factory default settings)
Command No. Command Descriptions
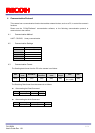
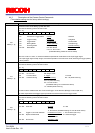
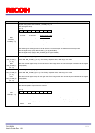
10H:
MOD1[70]
[Camera function mode setting 1] Initial data: 09H
This sets the following camera function mode.
D[70]
D7 D6 D5 D4 D3 D2 D1 D0
D7: Continuous / Trigger Mode 0: Auto 1: Manual
D6: Trigger Polarity 0: Positive 1: Negative
D5: Trigger Mode 0: Edge Preset 1: Pulse Width
D4: Binning Mode 0: OFF (Normal) 1: ON (Binning)
D3: Scanning Mode 0: Full scanning 1: Partial scanning
D2~D0: Reset Mode 000: Non-Reset 001: V-Reset
010~111: No function
(Prohibited setting. Please do not use these)
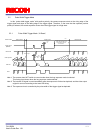
When D7 is set to “0: Auto”, a camera will detect its operational mode based on the input trigger signal.
If the input trigger signal is kept at high, the camera operates in the continuous mode, assuming the trigger polarity
is set to positive.
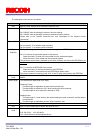
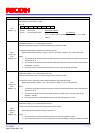
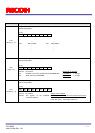
11H:
MOD2[70]
[Camera function mode setting 2] Initial data: 0
This sets the following camera function modes.
D[70]
D7 D6 D5 D4 D3 D2 D1 D0
D7~D4: No Function Set always “0000”
D3 Function Mode 0: Trigger 1: Normal
D2~D0: Partial Scanning 000: Full scanning 001: 1/2 partial scanning
010: 1/4 partial scanning
011~110: No function
(Prohibited setting. Do not set these values)
111: Variable partial scanning
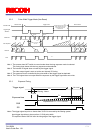
Function mode is enabled when the “Continuous/Trigger” mode selection (MOD[7] is manual (set as 1).
No video output without the trigger signal input while the camera works with the trigger mode.
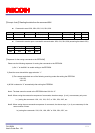
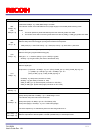
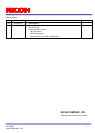
12H:
MOD3[70]
[Camera function mode setting 3] Initial data: 0
This sets the following camera function modes.
D[70]
D7 D6 D5 D4 D3 D2 D1 D0
D7~D6:
Video Out 00: 10bit 01: 8bit
10: 12bit
11: No function (Prohibited setting. Do not set these values)
D5: Trigger-in connector selection 0: Camera Link (CC1)
1: /IO connector (No.2 Pin)
D4~D3:
Exposure Start Mode 00: Normal 01: Reserved trigger
10 ~11: H reset
D2~D0:
No Function Set always “000”