


German_31
31_English
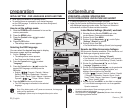
Datum und Uhrzeit einstellen
Stellen Sie die Werte für Datum und Uhrzeit richtig ein, sodass diese für
Ihre Aufnahmen korrekt gespeichert werden. Wenn Datum und Uhrzeit
bereits eingestellt wurden, können Sie diese nachträglich ändern,
indem Sie wie im Folgenden beschrieben vorgehen.
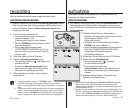
1.
Wählen Sie den Modus
“
Settings
”
(Einstell.).
Der Menübildschirm “Settings (Einstell.)” wird angezeigt.
Siehe Abschnitt “In den Modus Settings (Einstell.)
wechseln”
➥
Seite 30
2.
Drücken Sie die Steuertaste
( / )
, um die Option
“Date/Time Set” (Dat./Zeit ein) auszuwählen, und
drücken Sie anschließend die Taste OK.
3.
Stellen Sie die gewünschten Werte mit den
Steuertasten
( )
ein.
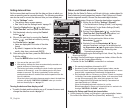
4.
Wechseln Sie mit der Steuertasten ( / ) zum
nächsten Einstellwert, und legen Sie anschließend mit
den Steuertasten ( ) die gewünschten Werte fest.
Die Elemente werden in der Reihenfolge des
Datumsformats angezeigt.
Die Standardeinstellung der Reihenfolge ist Jahr, Monat, Tag, Stunde,
Minute und AM/PM.
5.
Nachdem Sie alle Einstellungen vorgenommen haben, drücken Sie die
Taste OK, um den Vorgang abzuschließen.
Drücken Sie die Taste MENU, um das Menü zu verlassen.
•
•
•
•
•
Anzeige für Datum und Uhrzeit ein-/ausschalten
Um die Anzeige für Datum und Uhrzeit ein- oder auszuschalten, ändern
Sie im Menü den Modus Date/Time (Datum/Zeit).
➥
Seite 64
•
Die maximal einstellbare Jahreszahl ist 2037.
Nachdem Sie die Einstellungen abgeschlossen haben, werden
Datum und Uhrzeit automatisch auf dem Speichermedium in einem
speziell dafür vorgesehenen Datenbereich aufgezeichnet.
Die Knopfzelle dient zur Sicherung von Datum, Uhrzeit und anderen
im Memory Camcorder gespeicherten Daten, auch wenn das Gerät
von der Stromversorgung (Akku oder Netz) getrennt ist. Nach
dem Einlegen hält die Knopfzelle des Memory Camcorders bei
normalem Betrieb ca. 6 Monate.
Wenn die Knopfzelle schwach oder leer ist, und die
Bildschirmanzeige für Datum und Uhrzeit aktiviert ist, erscheint die
Anzeige “2007/01/01 12:00AM”.
➥
Seite 20
•
•
•
Die Standardeinstellung der Reihenfolge ist Jahr, Monat, Tag, Stunde,
•
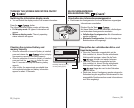
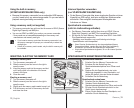
Date/Time Set
Move
OK
Set
120
MIN
2007 01 01
12 : 00 AM
Settings
MENU
Exit
OK
Settings
Move
OK
Select
MENU
Exit
120
MIN
Video
Setting date and time
Set the current date and time so that the date and time at which you
make a recording can be recorded correctly. The following procedure
can also be used to correct the date and time you have already set.
1. Set the “Settings” mode.
The settings menu screen appears.
See
“
How to set the Settings mode
”.
➥
page 30
2. Press the Control button ( ) to select
“
Date/Time Set
”
and then press the OK button.
3. Set the desired value by moving the Control
button ( ).
4. Move to the next item by moving the Control
button ( ) , and then set values by moving
the Control button ( ).
Items are displayed in the order of the date
format.
By default, it appears in the order of year,
month, date, hour, minute and AM/PM.
5. After setting the last item, press the OK button to
fi nish the setting.
Press the MENU button to exit the menu.
•
•
•
•
•
You can set the year up to 2037.
After setting, the date and time are automatically recorded on a
special data area of the storage media.
The button type battery maintains the clock function and preset
contents of the memory : even if the battery pack or AC power
adapter is removed. The button type battery for the memory
camcorder lasts about 6 months under normal operation from the
time of installation.
When the button type battery becomes weak or dead, the date/time
indicator will display “2007/01/01 12:00AM” when you turn the
date and time display on.
➥
page 20
•
•
•
Turning the date and time display on/off
To switch the date and time display on or off, access the menu and
change the date/time mode.
➥
page 64
•