PREPARATION
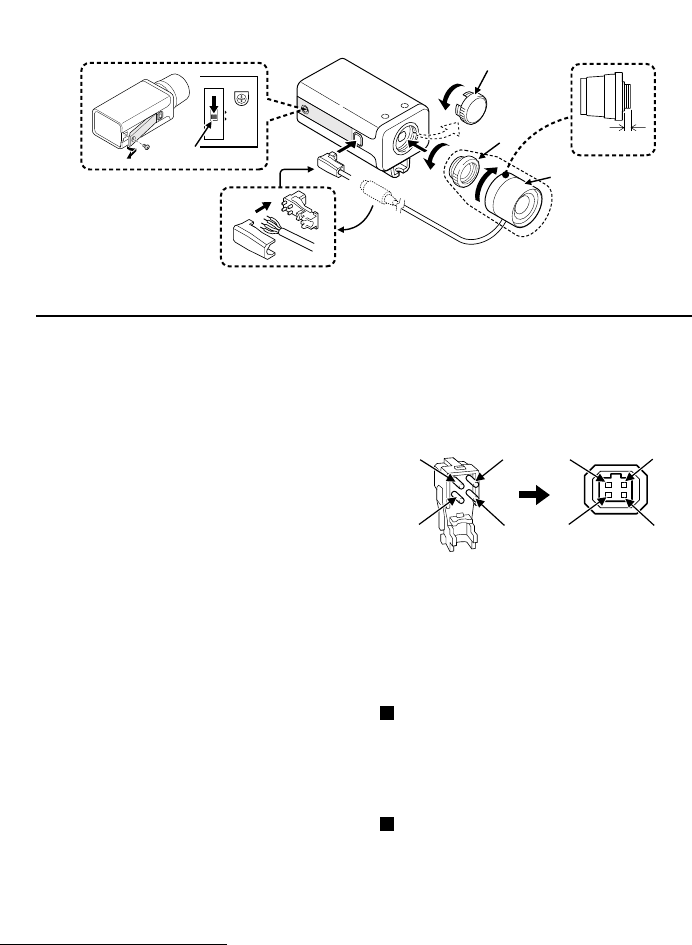
Installation of a VIDEO type lens (sold separately)
1/2 or 2/3 inch C mount type
(Flange-back: 17.526 mm)
1 Remove the lens mount cap.
2 Attach the supplied C mount adaptor to
the auto-iris lens.
3 Install the auto-iris lens onto the camera.
CAUTION:
Do not use a lens if the length “L” is
more than
5 mm. That may damage the
camera and prevent proper installation.
4 Check the lens specifications sheet to
make sure the lens iris plug layout is
compatible with the layout of the LENS
connector on the side of the camera.
CAUTION:
If the lens iris plug shape and/or the
connections layout are different, the
supplied lens iris plug will have to be
fitted, in order to be able to connect the
lens to the LENS connector on the side
of the camera.
LENS connector layout
1:+12 V DC (50 mA max.)
2:Not used
3:Video output (1.0 Vp-p, high impedance)
4:Ground (for video signal and DC power)
5 Set the A.I. LENS switch to the VIDEO
position.
Set the ALC and LEVEL controls on the
lens to adjust the iris. Normally the ALC
volume should be turned all the way to
Av (Average).
If using a VIDEO type auto-iris lens
Depending on the type of lens used, the
lens may not perform properly. In such a
case, adjust the LEVEL volume on the lens
casing to correct.
Compatible auto-iris lens
• f= 9 mm (Standard angle)
• f= 12 mm (Telephoto)
• f= 16 mm (More telephoto)
4
12
3
4
12
3
5
DC
VIDEO
4
1
2
3
L
L53L2/US GB 1995, 11, 1
English 7


