


18
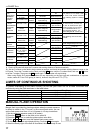
How to set the correct flash power level
Page 17 <<CHART A>> combination of
1
Focus on the subject and note the subject distance on the lens’ focus ring. Adjust the lens’ aperture until the
distance indicated on the LCD panel of the flash is equal to the camera to subject distance.
When you use with cameras other than the above
Focus on the subject and note the subject distance on the lens’ focus ring. Adjust either the flash power
level or the flash’s F stop display.
Please refer to the following on how to change the flash’s F-stop.
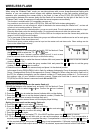
1. Press the SEL button several times and make the F-stop indicator blink.
2. Press the
+
button or
–
button to set the F-stop display.
3. Press the SEL button to make F-stop indicator stop blinking.
Set the distance indicated on the LCD panel of the flash so that it is about equal to the actual camera-to-subject
distance become about equal.
Then set the aperture value of the lens via lens’ aperture ring or cameras command dial.
You can calculate the correct exposure by using this formula.
Guide Number “GN” / Flash to Subject Distance = F-stop
This flash unit will calculate and indicate the Subject Distance by following the above formula. (Please refer to
table1 on the last page).
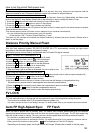
Distance Priority Manual Flash
With this flash operation system, EF-530 DG SUPER NA i-TTL automatically controls the light output
according to the selected distance and aperture value.
Distance-priority manual flash is not possible with D1X and D1H digital cameras.
Page 17 <<CHART A>> combination of
1
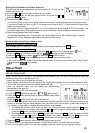
1.Set the camera’s exposure mode to either A or M mode.
2.Press
MODE on the flash unit so (GN) is displayed.
3.Press the SEL button to make the distance display blink.
4.Press the
+
button or
–
button to set the distance.
5.Press the SEL button several times to stop blinking.
6.Set the aperture value on the lens or camera.
7.
When the Ready Light of the flash is illuminated, the unit is ready for use.
When using with cameras other than the above
1.
Please follow the first 2 steps as above and p
ress the
SEL
button several times to make the aperture display blink.
2.Press the
+
button or
–
button to set the F-stop display.
3.Press the SEL button to stop the display blinking.
4.Set the aperture value on the lens or camera, make sure that the flashgun is charged before firing.
Distance-priority manual can be used together with exposure compensation.
1.Press the SEL button several times to make the compensation amount indicator blink.
2.Press the + or
-
button to set the compensation amount.
3.Press the SEL button several times to make the display stop blinking.
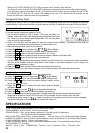
FV LOCK
“FV” lock mode allows you to choose and lock the exposure for part of the image before taking the picture.
This function is available with CLS compatible camera models only.
You cannot set this function on the flashgun directly. For details please refer to your camera’s instruction manual.
Auto FP High-Speed Sync FP Flash
When you take a picture with an ordinary flash, you cannot use a shutter speed faster than the camera’s
synchronized speed because the flash must fire when the shutter curtain is fully open. The FP flash keeps firing
while the shutter curtain is running. Thus you can use a shutter speed faster than the synchronized speed.
This function is available with CLS compatible cameras only.
You cannot set this function on the flashgun directly. For details please refer to your camera’s instruction manual.
When you set this function on the camera,
will be displayed on Flash’s LCD display.
Depending on the shutter speed, the Guide Number will change. (Please refer to table2 on the last page)