


12
OPERATION MENU
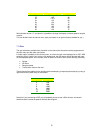
01 OUTPUT SELECT
HD SDI OUT
on/off
Highest quality output for critical monitoring, or recording to external device. Max cable run approx
60m. Uses power, so turn off if you need to conserve batteries.
REAR BNC OUT
VBS/SDI/off
Composite video (VBS) or SDI selectable from this output, as long as the downconverter option is
installed.
TEST OUT SELECT
HD/SD
Test output can deliver composite with menus superimposed, if downconverter installed, or one of
the HD components if HD selected. (Y, R-Y or B-Y)
DOWN CON MODE
SQEZE /LETTR/CROP
SQEZE The downconverter will also do aspect ratio conversion, and crop or letterbox the SD signal for you.
SQEZE is just standard 16:9.
02 FUNCTION 1
ASSIGN SW 1
EZ-FC
Lens Ret Various functions can be assigned to the button and switch on the side of the camera.
Front mic on/off: Loop record: test out chc: Vf markers: easy focus: Re-take: ATW: Return video:
Lens RET: Record: Turbo gain: Telemark: Zebra.
ASSIGN SW 2
F.Mic
VF markers Front mic on/off: Loop record: test out chc: Vf markers: Zebra
FRONT MIC SEL
Mono/stereo
DF/NDF
DF
NDF Drop frame mode for NTSC timecode sync.
END SEARCH
Off
LOOP/INTVL REC
Off
The loop recording and interval recording (timelapse) features are only enabled if the memory cache
option is installed.
LOOP REC TIME 1 - 8 secs (0)
You can choose to start recording what happened up t
o 8 seconds ago when you hit the REC button
TAKE TOTAL TIME
5min
When using timelapse mode, set the total real time duration of the event to be captured here.
REC TIME
5sec
Set the duration of the event once ‘timelapsed’ here.
NUMBER OF FRAME
1
If in manual timelapse mode, you can set the number of frames to be recorded at each interval here.
TRIGGER INTERVAL
5 MIN
If in manual timelapse mode, set the interval between frame captures here.
PRE LIGHTING
Off
In timelapse mode, the camera can turn on the power to the anton bauer light connector a set
interval before the frame is grabbed.
03 FUNCTION 2
WHITE SW B
Mem/ATW
The memory B position of the white balance switch can be re-
configured to be the auto tracing white
balance switch. (or you could allocate ATW to am assignable button.)
SHOCKLESS WHITE
Off/1/2/3
3 You can set a ‘soft’ transition from white balance mem. A to mem. B
ATW SPEED 4
The speed of the above transition is set here.
LOW LIGHT
Off/on
Turn off that annoying warning message…
LOW LIGHT LEVEL -99 to 99 (0)
….or set the level at which it appears.
BATTERY WARNING
10% - 20%
Sets the amount of battery warning for Anton Bauer batteries.
04 VF DISPLAY 1
VF DISPLAY
On/off
DISPLAY MODE
1/2/3
Mode 3 shows all warnings, and switch changes in VF, mode 2 shows some, mode 1 shows none.
EXTENDER
On/off
Following items determine how much information is displayed in your viewfinder:
FILTER
On/off
Displays which optical filters selected.
WHITE
On/off
Off Displays white bal. A/B/Preset
GAIN
On/off
Off Displays gain selected
SHUTTER
On/off
Useful to turn this one ‘on’ if in progressive scan, to remind you to use shutter.
AUDIO
On/off
Off Displays audio level meters
TAPE
On/off
Off Tape remaining time
IRIS
On/off
Displays F stop
05 VF DISPLAY 2
ZOOM
On/off
Off Numerical display of zoom position. Useful for reframing shots
COLOUR TEMP
On/off
White balance info.
VOLT
On/off
Battery voltage
DC IN
On/off
DC power input
WRR RF LEVEL
On/off
If you have the internal radio mic fitted, this will give you a signal strength reading in the viewfinder.
TIMECODE
On/off
TC in viewfinder, and on test out if characters enabled on test output.
GPS
On/off
Future option
06 ! LED
GAIN
On/off
There’s a warning ! marker that will appear in the viewfinder according to the way this page is set.
SHUTTER
On
/off
Off If you set an item to ‘on’ , then the ! will appear if that function is
WHITE PRESET
On/off
Off
ATW RUN
On/off
EXTENDER
On/off
FILTER
On/off
Off
OVERRIDE
On/off
07 MARKER 1
MARKER
On/off
CENTRE
On/off
CENTRE MARK 1 to 4 (3)
SAFETY ZONE
On/off
SAFETY AREA
80 /90 /92.5 / 95 %
ASPECT
On/off
ASPECT SELECT
14:9, 13:9, 4:3, Vista,
Scope
ASPECT MASK
On/off
Turns on / off the ‘greyed out’ side panels outside the aspect ratio mask selected .
ASPECT MASK LVL
0 to 8
Sets the degree to which areas outside the aspect markers are greyed out
100% MARKER
On/off