


Administrating the Camera
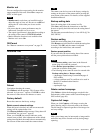
Configuring the System — System Menu
35
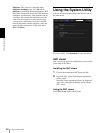
Date & time Tab
Current date & time
Displays the date and time set on this unit.
Note
After you have purchased the camera, be sure to check
the date and time of the camera and set as necessary.
PC clock
Displays the date and time set on your computer.
Date & time format
Select the format of date and time to be displayed in the
main viewer from the drop-down list.
You can select the format between yyyy-mm-dd
hh:mm:ss (year-month-day hour:minutes:seconds),
mm-dd-yyyy hh:mm:ss (month-day-year
hour:minutes:seconds), and dd-mm-yyyy hh:mm:ss
(day-month-year hour:minutes:seconds).
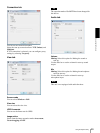
Adjust
Select how to set the day and time.
Keep current setting: Select if you do not need to set
the date and time.
Synchronize with PC: Select if you want to
synchronize the camera’s date and time with the
computer.
Manual setting: Select if you want to set the camera’s
date and time manually.
Select the year, month, date, hour, minutes and
seconds from each drop-down list.
Synchronize with NTP: Select if you want to
synchronize the camera’s date and time with those of
the time server called NTP server (Network Time
Protocol).
Set the NTP server when Synchronize with NTP is
selected.
Use the following NTP server address: Synchronize
with the selected NTP server address.
NTP server 1: Enter the first choice for NTP server
address.
NTP server 2: Enter the second choice for NTP
server address.
NTP server 3: Enter the third choice for NTP server
address.
DHCP server: Select DHCP server when you need to
get NTP server information from DHCP server.
Multicast: Select Multicast when you search for an
NTP server with Multicast.
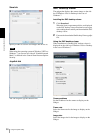
Time zone
Set the time difference from Greenwich Mean Time in
the area where the camera is installed.
Select the time zone in the area where the camera is
installed from the drop-down list.
For Japan, select “Osaka, Sapporo, Tokyo
(GMT+9:00)”
Automatically adjust the clock for daylight
saving time changes
When selected, the clock is automatically adjusted
according to the daylight saving time of the selected
time zone.
Note
If the time zone selected in Time zone is different from
that set on the computer, the time is adjusted using the
time zone difference and set on the camera.
OK/Cancel
See “Buttons common to every menu” on page 32.
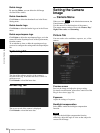
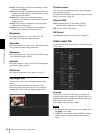
Superimpose Tab
Select whether to superimpose the camera ID, date/time
and other information on an image or not. A still image
can be also superimposed.
You can select whether to superimpose on Image 1 and
Image 2 or not, set the font size and configure each
displayed item.
Note
The superimpose setting for Image 1 is applied to Image
2 in the following conditions.
Codec information is not displayed.
• Image 1 and Image 2 are the same size and larger than
640 × 480.
•When Cropping is set to On in the Camera menu,
either vertical or lateral size of the cropped image is
larger than that of 640 × 480.