


22
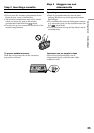
Stap 2
Instellen van de
datum en tijd
Voor het eerste gebruik van uw camcorder zult u
de datum en tijd moeten instellen.
“CLOCK SET” verschijnt telkens wanneer u de
hoofdschakelaar op CAMERA zet en datum en
tijd niet zijn ingesteld.
Als u de camcorder ongeveer 6 maanden lang
niet hebt gebruikt, kan de tijd- en
datuminstelling zijn vervallen (zodat er slechts
streepjes verschijnen) omdat de oplaadbare
batterij in de camcorder is uitgeput.
Dan stelt u eerst het jaar in, dan de maand, de
dag, het uur en ten slotte de minuten.
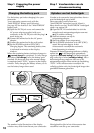
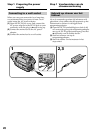
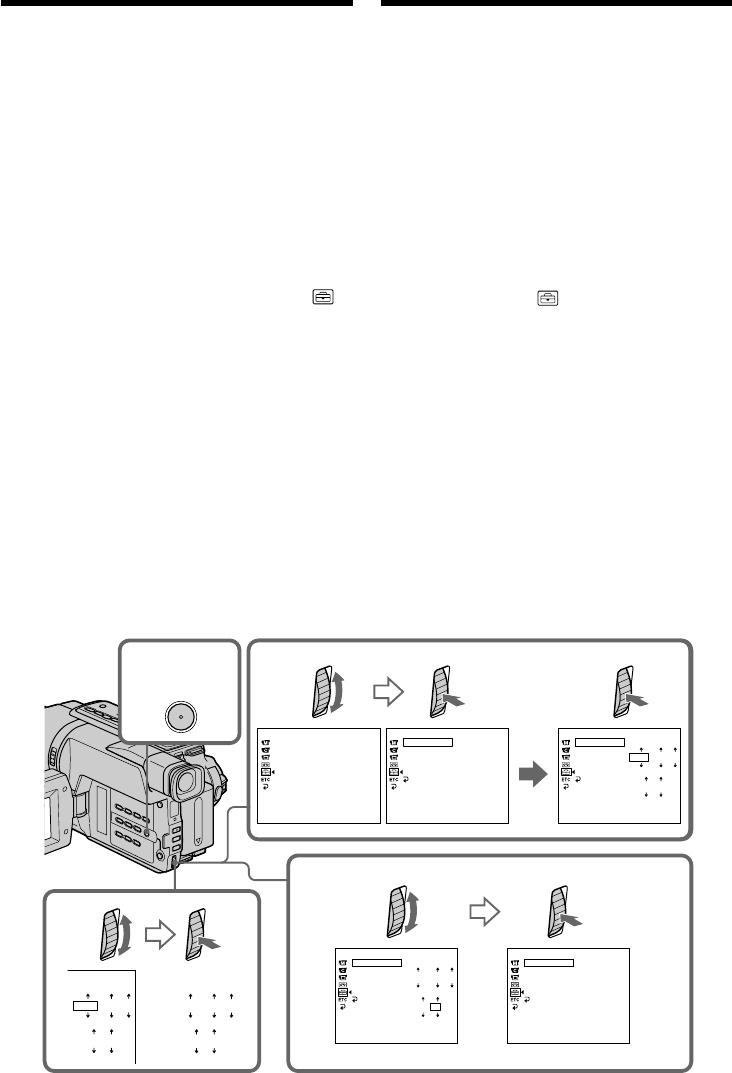
(1)Druk op MENU om het menu te laten
verschijnen met de camcorder in de CAMERA
stand.
(2)Draai aan de SEL/PUSH EXEC regelknop om
in te stellen op het pictogram en druk de
regelknop in.
(3)Draai aan de SEL/PUSH EXEC regelknop om
in te stellen op CLOCK SET en druk de
regelknop in.
(4)Draai weer aan de SEL/PUSH EXEC
regelknop om in te stellen op het juiste jaartal
en druk de regelknop in.
(5)Draai steeds aan de SEL/PUSH EXEC
regelknop om de maand, het dagnummer en
het juiste uur in te stellen en druk tussendoor
telkens op de regelknop om de instelling vast
te leggen.
(6)Draai aan de SEL/PUSH EXEC regelknop om
in te stellen op de juiste minuut, en druk de
regelknop in tegelijk met het tijdsignaal. De
klok begint dan te lopen.
(7)Druk weer op de MENU toets om het
instelmenu uit beeld te laten verdwijnen. De
tijdsaanduiding verschijnt.
Step 2 Setting the
date and time
Set the date and time settings when you use your
camcorder for the first time.
“CLOCK SET” will be displayed each time when
you set the power switch to CAMERA unless you
set the date and time settings.
If you do not use your camcorder for about 6
months, the date and time settings may be
released (bars may appear) because the built-in
rechargeable battery in your camcorder will have
been discharged.
First, set the year, then the month, the day, the
hour and then the minute.
(1)While your camcorder is in CAMERA mode,
press MENU to display the menu.
(2)Turn the SEL/PUSH EXEC dial to select ,
then press the dial.
(3)Turn the SEL/PUSH EXEC dial to select
CLOCK SET, then press the dial.
(4)Turn the SEL/PUSH EXEC dial to adjust the
desired year, then press the dial.
(5)Set the month, day and hour by turning the
SEL/PUSH EXEC dial and pressing the dial.
(6)Set the minute by turning the SEL/PUSH
EXEC dial and pressing the dial by the time
signal. The clock starts to operate.
(7)Press MENU to make the menu disappear.
The time indicator appears.
2
4
1,7
3
6
MENU
CLOCK SET
[
MENU
]
:
END
SETUP MENU
CLOCK SET
LTR SIZE
AUTO DA
TE
LANGUAGE
DEMO MODE
SETUP MENU
––
:
––
:
––
RETURN
[
MENU
]
:
END
SETUP MENU
000
[
MENU
]
:
END
RETURN
SETUP MENU
[
MENU
]
:
END
RETURN
CLOCK SET
SETUP MENU
[
MENU
]
:
END
RETURN
CLOCK SET
LTR SIZE
LANGUAGE
DEMO MODE
CLOCK SET
LTR SIZE
LANGUAGE
DEMO MODE
1
12002
4
7 2002
1
7:30:00
7
42002
1730
LTR SIZE
LANGUAGE
DEMO MODE
LTR SIZE
LANGUAGE
DEMO MODE
AUTO DATE AUTO DATE
AUTO DATE
AUTO DATE
1
12002
000
000
1
12002