


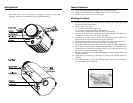


Front Optic Installation / Removal
To Remove Optic
1. Slide LOCKING PIN away from optic.
2. Rotate optic counter clockwise.
3. Pull away from housing.
To Install Optic
1. Perform an o-ring inspection.
2. Align optic to housing details.
3. Press optic into housing.
4. Rotate clockwise until LOCKING PIN engages.
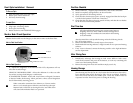
Monitor Back ID and Operation
Monitor Back installs into the Stingray in the same manner as the Rear Plate.
Monitor Back Identification
Monitor Back Operation
B - Adjusts the brightness of the Monitor Back LCD, adjustment will not
affect the recorded image.
VIDEO OUT BULKHEAD PORT - Allows the addition of a video out cable
for surface viewing while Stingray is underwater.
LCD MOISTURE ALARM - Audio and visual alarms will signal if moisture
is detected inside the housing. Alarm performs a three second diagnostic
check when initially receiving power.
When camcorder transitions from Memory to Camera modes
there is a 2-3 seconds pause while the camcorder keys the tape.
Monitor Back will black out during this time and LED alarm
will sound when Monitor Back is re-powered.
$
LED Moisture Alarm
B Button
Video Out Bulkhead Port
Pre-Dive Checklist
1) Install a Mini DV / Digital 8 tape and Memory Stick in the camcorder.
2) Install a completely charged battery in the camcorder.
3) Verify operation of all housing controls.
4) Check that the front bayonet port is securely engaged and that the latch pin
is in the locked position. Clean lens if necessary.
5) Check that the rear plate o-rings are seated correctly and that the rear latches
are in the closed and locked position.
First Time Use
All Light and Motion housings are pressure tested prior to
shipping. However, there could be unseen damage due to
shipping. A test dive without the camcorder in the housing
is recommended.
After the initial dive with just the housing, make the following checks.
1. Dry off housing exterior.
2. Remove the Rear Plate and visually inspect for moisture.
3. Reach inside the housing and trace a finger around all view ports and mating
surfaces.
4. If any water is detected, contact the housing reseller or the Light & Motion
service department.
After Diving Care
1. Immediately submerge the housing in fresh water. While in fresh water,
work all the switches and press all the buttons, to work any remaining salt
water out of the housing buttons.
2. Remove housing from rinse tank and then simply towel dry.
Housing Storage
Store housing and Travel Case in a dry location the first 24 hours after a dive.
Leave the Rear Plate off the housing to allow for air circulation. Similarly,
leave Travel Case Lid about two inches open. Allow any residual water to
evaporate from the Travel Case prior to storing the housing.
$